Thursday, July 16, 2009

I Shoulda Stitched Myself An Umbrella

Went to the park again after work and got some more stitching done.  It was HOT today, but all the sudden the sky went dark.  We started towards home but we didn't beat the rain.  We ended up having to duck under awnings and in door ways *three* different times to keep out of the serial deluges.
» read full post

Saturday, February 21, 2009

Mushrooms Finished

OK, these are the most fun things EVER to make.  I love making them so much that I had to consciously and diligently promise myself to not make more than five.  There are just so many other fun things to do.  If I let myself, all I would do until the end of time is make mushrooms.
» read full post

Tuesday, February 17, 2009

Mushroom Production In Full Gear

Well, the third time was the charm.  The blue spotted mushroom was my third prototype and it was perfect.  I've scrapped the first two prototypes (I tried to retrofit them, but it was a no-go).  Now I'm just cranking them out.
» read full post

Thursday, February 12, 2009

Mushroom Progress

I've been feeling like crap for days, so I'll let these photos speak for themselves.
» read full post

Friday, February 06, 2009

Mushroom Test

This is my first test mushroom for the now-closed mushroom swap hosted by the super-wonderful knitsonya.
» read full post

Tuesday, February 03, 2009

Softies That *I* Love ... And A Giveaway!

I get so excited every time the "sock and glove" rep (which is what I call her in my head ... her name is Melissa) emails offering a book to review.  She sends me the best stuff. :)

This time I got a copy of Softies Only a Mother Could Love.  The title implies that these are ugly softies, but, while they aren't your traditional teddy bears, they are an adorable lot.  Maybe I'm just acclimated to our indie and Japanese-inspired style.
» read full post

Tuesday, August 05, 2008

Even Cuter Supercute Sea Creatures

I made the Supercute Sea Creatures pattern available in November ... which isn't a very sea creature-y month.  Now that summer is in full swing, I thought I'd share you some of the awesome creations made using my pattern.
» read full post

Monday, July 21, 2008

Birthday Squirrel

This is a birthday card I made for a coworker.
» read full post

Monday, April 28, 2008

Bacon Of Hate

The latest issue of The AntiCraft just came out, and it's entirely devoted to bacon.  Remember the bacon project I teased you with?  Well, now you can make your own Bacon Of Hate.  Well, what are you waiting for? :)
» read full post

Tuesday, April 22, 2008

Tutorial: Simple Felt Daisy

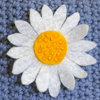
Create quick and easy daisies from felt. Each step is accompanied by a photo.
» read full post

Monday, March 17, 2008

Makin' Bacon

Here's a sneak peek at my bacon makin'.
» read full post

Thursday, March 06, 2008

Delighting Wee Bairns Since 1985

I fell in love with Angelina's son Max when I read this post.  Not only is he the weird and wonderful son I would have loved to have had, I see a little bit of myself in him.  So, when Angelina mentioned in passing that Max would probably love a headless bunny egg in his Easter basket, I immediately promised he'd have one.
» read full post

Monday, March 03, 2008

Octopus Completed, For Reals

I decided against the green sequins I originally picked out.  You can see them in the last post.  Instead, Stanislav got some snazzy mini-stars suckers.  Let me tell you, it's a *pain* to put on the suckers after you've sewn on the legs.  My floss kept getting tangled in all his loopy legs.
» read full post

Saturday, March 01, 2008

Ack, I Thought I Was Done

I started to set up the photo shoot for my "finished" green octopus ... and then I saw the tray full of sequins and beads. Ack!  I forgot the suckers.
» read full post

Thursday, February 28, 2008

Green Octopus

I'm working on my contribution to the prizes for Vivi's Tricot du coeur charity blanket drive.

All I have left is 1.5 legs, stuffing the body, and putting it all together.  I should finish it this week.  Yay!
» read full post

Tuesday, December 11, 2007

Tie-Dyed Jellyfish And Purple Fish

Here is a more evidence of my "little problem" in regard to ornaments.  When Crafty McGee posted that she had a couple left over ornaments to trade, I JUMPED on it.  Breathlessly.

For my part of the trade, I made her the tie-dyed jellyfish above.  I have a stash of tie-dyed felt that I finally cut into for this little guy.

The jellyfish seems to be the most popular of the Supercute Sea Creatures, which is a little bit of a surprise to me.  I would have thought it would be the octopus.

I also made her a purple fish with a sequin eye stripe.  I thought the silver sequins would look good paired with Christmas lights,  But now that I think about it, these little guys might be on her light-less tree ... in which case the sequins will bring a little bling to the mix. :)

I can't wait to get my little tree from Crafty McGee.  I think it's uber brilliant that she put the eyelet for hanging in the middle of the treetop star.
» read full post

Tuesday, December 04, 2007

Lenore's Got Mad Skillz

** update: pattern available as free download **

Last January, I got the sweetest email from a woman named Lenore asking for the pattern for Octophrost.  She told me:

"Every year I make a Christmas ornament for my grand and great grand children.  I would love to make this little fellow.  For Christmas 2006 I made 90 ornaments.  Three more babies are expected that I know of so I may need to make near 100.  That means starting early."

The pattern was no where near ready.  I wanted to be a part of her Christmas plans, so I worked hard to get something together.  I sent her the pattern in mid-February, about 2 months before I posted it.

In that time, we corresponded a little and I learned a more about Lenore.  She's 73 (maybe 74 now).  She sent me a picture from a recent family reunion, and I cried when I opened it up and saw all those wonderful people.  In fact, it's making me cry right now just thinking about it.  It's overwhelming to think that, however tangentially, I'm a part of their heart-felt, hand made, family tradition.

I've also kept in touch with Lenore's daughter Lucy, of My Byrd House. She's given me updates over the last year, and it's been so fun to think about Lenore patiently (I imagine) and lovingly sewing 99 Octophrosts for her family.  She's posted lots of pictures on her blog.  The tree in the picture above has 99 Octophrosts on it!

I want Lenore to know how honored and thankful I am that she chose Octophrost for her ornament this year.  I also want her to know that she's a wonderful example to all of us of how to make the moments of our life personal and memorable.  This experience will always be a treasured memory for me.  I hope that in my own life, I'm able to spread such warmth and joy to the people around me.
» read full post

Sunday, December 02, 2007

Really Supercute Sea Creatures

When I posted the Supercute Sea Creatures pattern, I gave the first five commenters a free copy.  Lucky for me, June, of Planet June was one of those people.

She made these adorable all-white sea creatures using my pattern.  Her post includes a details about how she sewed each creature and a close-up photo of each, so go read it. :)

For all you crochet lovers, June sells awesome amigurumi patterns for a staggering array of cute animals.  Definitely check them out.
» read full post

Sunday, November 25, 2007

Addition To Blanket Stitch Tutorial

When I made the jellyfish for the Supercute Sea Creatures, I used a single line of blanket stitch along the bottom edge.

My blanket stitch tutorial only showed how to do blanket stitch if you were going all the way around.  I added a little section to the tutorial that shows you how to start a blanket stitch if you don't intend on meeting back up with the first stitch so you can keep your first stitch vertical.

That tutorial page is WAY long.  It's such a monster.  I need to rethink that page and get it looking more usable.  Maybe I should split all the little bits up and put them on their own pages.  Hmmm.
» read full post

Friday, November 23, 2007

Supercute Sea Creature Patterns & Instructions

I'm so excited about completing another pattern, which you can now get on the free downloads page. I designed the octopus in April, and he languished on my craft table since then.  Just last week, I decided to re-do my starfish pattern and add a jellyfish and fish to the group.

They are all easy-to-make and perfect for customizing.  There's lots of room for experimenting with color combinations and embellishments.  I think an all-white set would be really cool, too.  There are a couple extra photos in the Futuregirl Supercute Sea Creature Flickr group.

Each creature is between 3 and 4 inches tall and wide, which makes them the perfect size for ornaments, package tags, or clip-ons for backpacks.
» read full post

Wednesday, November 21, 2007

Anticraft Project Two

I originally designed the Bad Eggs around Easter of 2006.  I did a set of four in black with embroidered designs.  At the time, I thought subversive Easter eggs (traditionally-colored eggs with non-traditional imagery) would be hilarious, and I got my chance to make some when they were accepted  for the Anticraft  book.

Look at that squirting arterial blood!  I can't tell you how much I love that decapitated bunny.  It warms my heart.  I couldn't be happier about how it turned out.  The white-on-white embroidery outlining his leg doesn't photograph well, but it looks good in person.  His tail is a bunch of floss loops making a 3-D puff.

Ahhhh ... a cute chick with a taste for eyes.  Chirp!  The eyes filling the basket are made with a tiny sequin and a black seed bead ... and embroidered eyelashes.  I do realize that if a chick was digging the eyeballs out of peoples' heads and collecting them in a basket that they wouldn't still have eyelashes, but I think that makes it all the more creepy. :)  It totally oogs me out that the chick is holding an eye by the optic nerve.

The other two eggs in the Bad Eggs set are based on the original designs.  One is embroidered with 360° flames and the other has evil eyes on each side in alternating warm and cool colors.

Certainly, you could make non-snarky Easter eggs with the pattern ... but why would you? ;)
» read full post

Tuesday, October 30, 2007

The Seahorse Family Stuffies Pattern Is Available

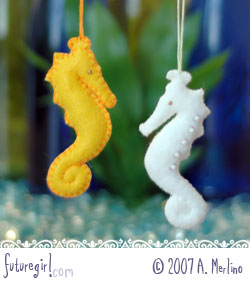
Yay!  I can't believe how fast I finished up the pattern and all the web changes I needed to make.  The PDF includes the pattern pieces and instructions for both an adult and a baby seahorse.  They are super cute, if I say so myself.

You can check out the seahorses made by my awesome testers in the Futuregirl Seahorse Stuffies Flickr group.  Thank you so much Korallin, Diane, and Sara!

I should have mentioned in my last post that Andrew is the genius behind the seahorse photos.  He's the one that knows how to light things, knows how to position things, and knows how his camera works ... you know, everything.  I've learned a ton from him since I started this blog.  We always have so much fun setting up the elaborate photo shoots together.  He's the best and I'm so lucky he's mine!

Last night after I posted, I tied my copy of Crochet Me closed.  I'm totally serious.  I didn't just do it for the blog.  I haven't even opened it once - not once.  I think if I hadn't tied it closed, I would have been crocheting today instead of finishing up the pattern.  Now I'm so excited to get started on swatching!

» read full post

Monday, October 29, 2007

Teasing You With Baby Seahorses

** update: pattern on free downloads page **

I'm *this close* to finishing the pattern and instructions for the my seahorse stuffies.  I know I shouldn't say anything before it's ready, because I'm totally jinxing myself, but I'm sure it'll be up soon!

I'm including the pattern and instructions for both adult *and* baby seahorses.  The adult pattern looks just like Sasha and the baby pattern is what I used to make the two little cuties pictured here.

The only thing holding me back is that I just got my copy of Crochet Me in the mail and I'm fighting the urge to start swatching for the Icelandic Cowl.  I've decided that I'm going to use every bit of my will power and not open the book until I have the seahorses finished and posted.

I'm not sure if I'll be able to resist ...

Here's a little behind-the-scenes shot from today.  It's pretty ridiculous how much I love setting these things up. Oh, I just realized I need to add 'photoshop out the strings' on my list of things to do ... I better get to work! :)

» read full post

Saturday, October 06, 2007

Choosing A Stitch For Hand Sewing

Now that I have two tutorials on hand sewing felt, I thought it would be a good idea to talk about the benefits and disadvantages of both.  Each works well and brings a distinct look to your hand sewn item.  It's worth it to think about what sort of effect you are going for to help you choose the right stitch.
» read full post

Sunday, September 30, 2007

Tutorial: Hand Sew Felt Using Blanket Stitch

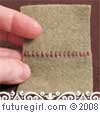
This step-by-step tutorial explains exactly to use the blanket stitch to both sew two pieces of felt together and use it as an edging. There are special tips on how to go around corners, to stitch around circles, and what to do if you run out of floss in the middle. Each step is accompanied by a photo.
» read full post

Friday, September 14, 2007

Set Sail

* * * * * *
UPDATE:  The Starling Handbag crochet pattern for the purse above is now available on the free downloads page.  Yay!
* * * * * *

I'm not just churning out overly-serious posts about lists over here ...

This handbag is ready to travel to it's final destination.  I added some leaves to the tulip label and whipped up a new one for Germany.  I love the little beer stein on the Germany label - it even has a hinged lid.  Just in time for Oktoberfest!

Here you can see the world map fabric Elizabeth picked out for the lining.

» read full post

Wednesday, February 07, 2007

Never Enough Felt

Thank you for all the organizational love.  Who else, but you guys, would appreciate something like that? :)

Lots of people emailed asking about buying felt online.  I'd never looked before, because it's so easy for me to find around here ... and now I wish I'd never looked.  Danger! Danger!

Create For Less has every color of Kunin Felt in sheets and some colors on bolts. I didn't realize I was missing so many colors.  Lemon Frost must be mine!

Some other places that sell acrylic felt online (let me know if you have a source and I'll add it):
Dick Blick - assortments
Joann's  - assortments and bolted felt
Munro - Kunin Felt, phone orders

And, for those of you who prefer swanky wool felt, Old School Acres posted a bunch of info and links yesterday.
» read full post

Wednesday, January 17, 2007

Tutorial: Hand Sew Felt Using Whip Stitch

This step-by-step tutorial explains exactly to use the whip stitch to sew two pieces of felt together. Each step is accompanied by a photo.
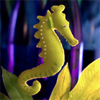
» read full post

Sunday, April 23, 2006

Clean or Dirty

Keep track of whether the dishes are dirty or clean with this handy status indicator. Keep her dress down for Clean and flip it up for Dirty. Made with felt, embroidery floss, and magnets.
» read full post

Monday, March 27, 2006

Bad Eggs

This project was a confluence of many things: (1) Sigmund's body, slightly modified, is egg shaped; (2) There is Easter stuff everywhere; (3) I saw the coolest alterna-holiday crafties at Green Kitchen.

The flame egg, the stink-eye egg, the skull egg, and the devil egg are the scary goth cousins to the cutesy Easter decorations that have overrun every store I go into. I went for evil-child-whimsy with the stitching.

Overall, I am pleased, but I have a couple of complaints. (1) The black orbs don't look egg-like. The pictures actually look pretty good, but in person, not so much. If I were to do it again, I would make the eggs in traditional pastels and then stitch the subversive designs on them. A kind of bait-and-switch. (2) The red thread I used for the devil blends right in and doesn't stand out enough. Again, in the picture it looks OK, but in person you can barely see the thread. (3) The red horns and pitchfork are spread out way too much, so you can't really see them all at once and it's unclear what I was going for. (4) If I didn't have a use for cute Easter eggs, what use do I have for evil Easter eggs? Sometimes I'm too clever for my own good.

I tried something new with this stuffie. I sewed a one inch wide washer (a flat round piece of metal with a hole in the center for a screw) to the inside of the bottom piece of felt. It works well for stability and for weight. I usually use plastic pellets for weight and stability, but for such a small shape plastic pellets really aren't enough unless you fill the whole thing with them.
» read full post

Monday, March 20, 2006

Sigmund the Octopus

** update: This pattern is now available as a free download! **

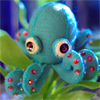
This original stuffie is the culmination of 5 pattern pieces, 25 felt pieces, 50 beads, 52 sequins, and hours of sewing. Whew! I had no idea what I was getting myself into when I decided to design an octopus back in February. I was flying high on my easy success with the owls.   An octopus is a different story.

I have a yard of cream felt that I bought to do prototypes. There is a graveyard of weird cream arms and orbs in the lead-up to a fully recognizable octopus. The biggest challenge was the arms. I wasn't exactly sure what I wanted them to look like. The solution I came up with seems obvious now, but I didn't get it on my first try.

I also didn't work out what I was going to do for a face until I had the body and bespangled legs all sewn together. There were a couple of ways to go with the face. One is Japanese-cute wide-eyed and human-ish. I decided to go with inhuman, indifferent, google-eyed animal. Sigmund creeps me out. I imagine big sharp teeth hiding under all those legs. Why is he staring at me like that?!

I was so excited when I finished Sigmund. I wanted to honor him with a kick-ass photo shoot, so I bought that cool aquarium grass you see in the picture. I was hoping to find a cheesy treasure chest or goofy diver, too, but they only had realistic looking rocks and sea urchins and stuff. I was impressed. I almost bought one of those big undersea photos that you can tape on the back of your aquarium to use as a back-drop, but I thought that was going too far (... says the girl who just sewed a bazillion sequins on a small stuffed octopus ... ha!).

I am going to do a set of three original sea creatures. I like doing things in sets of three, like I did with the owls. I already have the next one's prototype done, and it's looking good. I going to keep it a secret for now, though. :)
» read full post

Sunday, February 26, 2006

Three Owls

These are my first original stuffies. They are tiny - ranging from 1.5 inches to 2.5 inches tall. I made them out of felt and stuffed them with polyfill and plastic beads.

I named the littlest one Bukowski because his colors remind me of a Post Office uniform and the writer Charles Bukowski worked for the Post Office for many years. Plus, he looks kinda cranky and ornery, just like Bukowski. He also reminds me of Meatwad from Aquateen Hunger Force.

The medium one is named Blaze.  All his points make me think of flames.  I like flames.

The tallest owl made me think of an evil professor with hypnotic eyes, so he was named Bucky after Buckminster Fuller.  Buckminster wasn't evil, but he was odd, which is close.

The road to my owl trio

My husband bought me a coffee mug with owls scratched into the glaze. One night, inspired by the mug, I made a quick small felt owl based on one of the mug-owls (the cream and brown owl). It came out looking great, but it couldn't stand up. I decided to make an owl that would stand up on it's own.

I scanned my pattern pieces into the computer (they were pencil drawings) and redrew them in Illustrator making changes to the design. I also incorporated a round bottom piece into the pattern and made owl number two. This one stood up, but I wasn't satisfied with it's owl-i-ness yet (the orange and black owl).

I did a Google image search and spent time looking at owls. There are all sorts of owls! I was totally fascinated. I decided I was going to make a set of three owls. I drew the pattern pieces for each of them in Illustrator, cut out the felt, and then sewed them together.

I enjoy making the stitches a part of the design, as well as adding embroidered embellishments. This started with Monsieur Kitty where I added my own tummy embroidery to the Japanese stuffie. Bukowski has the outline of his wings from front to back, blanket stitching around his eyes, and a tiny three-stitch beak. Blaze has french knots holding on this purple beak on the front and the violet flame on his back, stitched eyes, and stitches outlining his body. Bucky has fabulous asterisk eyes and v-stitched feathers.

Now I need to make a set of owls with sequin eyes!
» read full post

Wednesday, February 22, 2006

Art Nouveau Rose Pincushion

I wanted/needed a pincushion. I found inspiration from an Art Nouveau Poster by Ludwig Hohlwein from 1910 that I have on a postcard. I recreated the large rose at the child's feet.

The pincushion is 2.5 inches square and half as thick. To get the pieces, I scanned in the postcard, enlarged the rose to the right size, and printed it out. I cut around the outside of the rose shape on the paper and used that as a pattern to cut out a piece of felt. Next, from the paper, I cut away the shape of one of the rose petals. Then I placed the paper back over the felt piece and traced the edge of the cut. Then I cut out just that petal from the felt piece. I repeated that for each of the petals and then the middle. This might be a good thing to do as a tutorial - cutting pieces of a design out of felt.

I decided to sew the pieces on with black floss, instead of floss the color of the felt, to give the design a wood-cut look. When I was done, the rose wasn't centered. I put the middle piece in the center not realizing the petals aren't all even. Husband-with-good-ideas to the rescue, "Why don't you just add some leaves?" Why not, indeed. They complete the design nicely. I don't think it would have looked half as good without them.

Speaking of how good it looks, sweet husband Andrew took this photo and the excellent close up of the turtle. Aren't they great?! His photography is on display at bluepanic.com. Interested in what I look like?

Oh, yes, I was talking about the pincushion :) ... I was worried about the white stuffing showing through the sewing holes in the design, so I put another layer of black felt under the top. I also doubled the pink felt on the bottom. The image shows the bottom stitching. I should have doubled the felt on the sides as well. They would have bulged less and I could have stuffed the pincushion more firmly - which is key, as I learned with my prototype.

For the prototype, I used one of the graphic roses in the lower right hand corner of the poster. I was thinking I would make it look like a petit four, hence the stitching around the edges. It was about 1.5 inches square and half as thick.

The prototype was doomed in many ways. (1) I did not have my fancy system for cutting out the rose pieces yet, so I cut each one out separately. They just don't look right together. (2) I cut out a top and bottom square and one long strip for the sides. I sewed the strip to the top square, then I sewed the strip to the bottom square. None of the corners matched up and it's completely askew. I need to use separate pieces for each side for shapes like this. (3) I put a modest amount of stuffing in the pincushion. I didn't realize that you need to stuff it way-tight so the pins don't just sink in all the way. For the week or so that I used this little cushion all my needles were fully embedded and sticking out the bottom.

It was not all-bad, though. I really like the white blanket stitching around the edges of the white rose pieces. That came out looking lacy and gave each piece a solid white outline - exactly what I was going for.
» read full post

Saturday, February 18, 2006

Turtle in bloom

I used the turtle pattern in Aranzi Aronso book ISBN4579109783 as a starting point. I decided I wanted to make a tiny felt turtle instead of the big floppy fabric turtle they feature in the book. My turtle easily fits in the palm of your hand.

I planned on doing some geometric embroidery on the shell, but when the time came, I had the urge to sew flowers. I put in the stems and leaves then I added the flower tops one color at a time. I like the way the flowers are spaced and balanced - it looks like I planned the embroidery instead of improvised it.

This is the first time I've used sequins for eyes. I LOVE the way they look. I put a medium black sequin over a pink sequin and attached them with a french knot. The french knot has to be very big and tight to keep the sequins on, otherwise they *boing* right off the turtle's face and go hide in the carpet. Black seed beads would work better than french knots - I need to get some. The shiny sequin eyes have a glint and give the turtle an impish personality. I have a ton of sequin sizes and colors - I can't wait to try out other combos!

The pattern would have worked perfectly for a floppy turtle. It wasn't perfect for the stiffer felt. When I stuffed the turtle the belly bloated out, so I had to sew the underneath of the legs to the belly a little so they point down instead of straight out like the turtle is flying. I didn't attach the head and legs as the pattern suggested and I ended up having to make the bottom circle 120% bigger (thank you Photoshop). I'd like to design my own turtle that would work better in the felt.
» read full post

Wednesday, February 08, 2006

Birthday Puppy

I am about to burst from an overload of c-u-t-e! My husband's birthday is coming up and I made him this puppy. When I bought this Japanese stuffie book (ISBN4579109783) he asked me to make one of these for him. That was this summer, so it should be a surprise. The doggie (real one) in the picture is one of his favorite breeds. We can't have a dog in our apartment, so I thought this would be the next best thing.

Birthday Puppy is made from plush acrylic felt. That stuff is wonderful! Your stitches get buried in the fuzz and it looks and feels very cuddly and soft. Wal-mart sells it from bolts in tan, black, and white (perfect for a panda baby!). I sewed him by hand. His body, arms, and legs are all half-filled with plastic pellets, so he has an unexpected weight to him. He feels solid and huggable. I just want to squeal with glee!
» read full post

Tuesday, January 31, 2006

Skeleton Hand Puppet

This is a felt skeleton hand puppet I made in 2000. I was working with someone who was OBSESSED with eBay. He was always pulling us into his office to show us the stuff he found that he "just had to have." One day he declared his need for a small felt skeleton hand puppet. It was $40. I told him, "I can make you one for about 10 cents worth of felt." And I did. :) Mine looked just like the one he was going to buy and he loved it.


» read full post

Thursday, January 12, 2006

Cute Monkey Stuffie and Elephant

This is my second stuffie from the Palm Sized Stuffies Japanese book ISBN4834722449.

I experimented with using the google eyes thinking that they would look better than my roughly cut out felt circles, but I was a little disappointed. Instead of looking like a cool japanese-cute stuffie, he looks like a cheap carnival monkey. BUT, I love him to death. He is one of a pair of animals that were made for our friend in Thailand.

Monkeys and Elephants are special animals in Thailand and purple is one of the national colors. With the Elephant, I experimented with button eyes, which came out kind of cool looking. I used the same arms and legs as the monkey, but I designed a body, trunk, and ears just for the elephant. I was particularly proud of the way that the ears turned out.


» read full post

Tuesday, December 13, 2005

Monsieur Kittie - My First

Here is the first palm-sized stuffie I made. He probably dates back to August. His pattern is from Palm-Sized Stuffies ISBN4834722449. You can tell he's the first because everything is just a little weird. One foot is bigger than the other. The head-shape is a little lop-sided. The stitching is not quite straight or uniform.

Even though he is imperfect - perhaps even because of his imperfections - I love Monsieur Kittie. I love his orange beret. I love his tummy embroidery. I love his freaky little mouth almost hidden under his black nose.

The (semi-)success with Monsieur Kittie inspired me to make many more palm-sized stuffies and to buy many more Japanese felt stuffies books.


» read full post

Thursday, November 24, 2005

Thanksgiving Kitties

Here are the thanksgiving kitties I gave to my in-laws today. Their pattern is from Palm-Sized Stuffies ISBN4834722449. I was already making them this cute set of baby kitties, but I recently finished them and thought that making them an Indian and a pilgrim would be fun for the holiday. I've been calling them "The Indian" and "The Pilgrim" for the last week. The feathers and hat are just pinned on, so maybe they'll get a set of reindeer horns and a Santa hat for X-mas!
» read full post