I originally designed the
Bad Eggs around Easter of 2006. I did a set of four in black with embroidered designs. At the time, I thought subversive Easter eggs (traditionally-colored eggs with non-traditional imagery) would be hilarious, and I got my chance to make some when they were accepted for the
Anticraft book.
Look at that squirting arterial blood! I can't tell you how much I love that decapitated bunny. It warms my heart. I couldn't be happier about how it turned out. The white-on-white embroidery outlining his leg doesn't photograph well, but it looks good in person. His tail is a bunch of floss loops making a 3-D puff.
Ahhhh ... a cute chick with a taste for eyes. Chirp! The eyes filling the basket are made with a tiny sequin and a black seed bead ... and embroidered eyelashes. I do realize that if a chick was digging the eyeballs out of peoples' heads and collecting them in a basket that they wouldn't still have eyelashes, but I think that makes it all the more creepy. :) It totally oogs me out that the chick is holding an eye by the optic nerve.
The other two eggs in the Bad Eggs set are based on the original designs. One is embroidered with 360° flames and the other has evil eyes on each side in alternating warm and cool colors.
Certainly, you could make non-snarky Easter eggs with the pattern ... but why would you? ;)
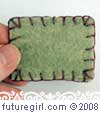
This step-by-step tutorial explains exactly to use the blanket stitch to both sew two pieces of felt together and use it as an edging. There are special tips on how to go around corners, to stitch around circles, and what to do if you run out of floss in the middle. Each step is accompanied by a photo.
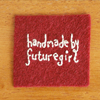
In this tutorial, I show you how I make my handbag labels and how you can embroider any design onto felt. Photos illustrate every step of the process.
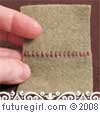
This step-by-step tutorial explains exactly to use the whip stitch to sew two pieces of felt together. Each step is accompanied by a photo.