Wednesday, May 14, 2008

Crafting In The Spaces

In the space between putting on my shoes and leaving to see a movie this flower got attached to this bag.
» read full post

Monday, January 21, 2008

Tutorial: Sew A Lining For A Crocheted Bag

This tutorial can be used to sew a fabric lining for any kind of bag that is either flat or has a boxy shape.  It's especially for sewing into a crochet handbag, which will be the subject of my next tutorial.
» read full post

Wednesday, December 19, 2007

Super Duper Shop Update

I just posted 4 medium birdcage handbags and 6 small birdcage handbags in my shop.

It would be so embarrassing to tell you how long I've been working on these handbags ... so I'll tell you: about 10 months.  Little by little, I've been crocheting, embroidering, sewing, and assembling these little beauties.

I'm actually glad it took so long, because each of these is completely up-to-date, technologically speaking.  They all have their seams finished by pulling all the thread ends to the back and then hand tying them, which I learned about in July.  They have pockets, which is a recent-ish addition to my handbag lining.  All in all, I'm completely pleased with how they turned out.

I know the timing couldn't be worse for a shop update ... it's *almost* too late to buy one for a Christmas present and everyone's probably spent all their cash anyway.  But it was perfect timing for me because a nice young gentleman purchased the last thing in my store this afternoon while I was getting this update ready.
» read full post

Tuesday, November 27, 2007

Black & Pink Commission Handbag

This commission-er found me when she was Googling something (I didn't think to ask what), and emailed me to see if I would make her a handbag.  She was very specific.  She wanted Barb's handbag with black, pink, and white replacing the blues and ecru.  She even verified the dimensions, the presence of pockets, etc.  She is a detail-oriented woman after my own heart.

The resulting handbag is adorable.  I had to buy new fabric for the lining (HAD to ... really).  I couldn't decide between getting this print in white on black or black on white - so, I bought them both!  I used the black for the lining and the white for the pocket.

At first I didn't know why I loved this fabric so much, but when I got home I realized that it totally reminded me of the wonderful Japanese designs in Japanese Patterns, which Andrew bought me for my last birthday (over a year ago).

Do you see all those bookmarks?  That's only the right half ... there are more on the left half.  The plan is to embroider these designs.  I'd really love to tackle the dot designs in French knots.  But it might be another year before that project moves to the top of the list.
» read full post

Friday, September 14, 2007

Set Sail

I'm not just churning out overly-serious posts about lists over here ...

This handbag is ready to travel to it's final destination.  I added some leaves to the tulip label and whipped up a new one for Germany.  I love the little beer stein on the Germany label - it even has a hinged lid.  Just in time for Oktoberfest!

Here you can see the world map fabric Elizabeth picked out for the lining.

» read full post

Sunday, August 26, 2007

Daisies

This special request handbag is for Marietta's sister.  Her only requirement was that it include at least one daisy.

I futzed around with daisy ideas before settling on these simple felt ones.  Crochet daisies just weren't "daisy enough" for me.  If you're interested in making your own felt daisies my daisy tutorial is available exclusively on Whip Up.

Whip Up's theme for this month is Simple Crafts. These daisies certainly fit that bill.  Whip Up is looking for article and tutorial submissions. Check out their submission guidelines.  Maybe there is something you could write up for them.

Once I figured out the daisies, I knew they'd only look right to me on a blue handbag ... daisies against the bright blue summer sky.  I put two daisies on each side of the bag.

I didn't think I'd have the right lining fabric in my stash ... but when I looked I rediscovered this great print.  How perfect is it?!
» read full post

Tuesday, August 21, 2007

Wash Test

The Experiment
How does the acrylic felt I use stand up to washing in the washing machine?

What I knew
The cotton yarn I use comes through the washer great. I've washed my handbag lots and it comes out looking better every time.  I dry it about half-dry in the dryer on low and then air dry it the rest of the way.  But my handbag is all yarn.

I've seen two of my handbags with felt embellishments months after giving them away.  On both, the felt looked a little 'brushed,' but otherwise the felt and embroidery seemed to hold up well.  One had been washed in the washer and one hadn't.

The Test-ee
I sewed on several felt pieces, did a little embroidery (including French knots), and attached one seed bead. I made sure to use pieces of felt with sharp points on them.

The Test
Washed in the washing machine on normal in cold with Cheer Free detergent.

The Results
I couldn't tell the difference once it dried.  The sharp points of the felt were intact and, as you can see, everything looks exactly the same.  It seems to me, the 'brushed' effect felt gets is from daily use, not washing.  And, that is easily remedied by carefully trimming away the wispy bits if/when they appear.

Conclusion
I would feel foolhardy recommending that you toss one of my birdcage handbags into the washer without putting it in a lingerie bag and/or using the gentle cycle, but, I'm proud to say, it could probably handle the washer all on it's own.
» read full post

Wednesday, August 08, 2007

Handbag For Barb

I made this handbag for a previous co-worker.  She noticed that I made myself a handbag, and saw me crocheting all the time, so she asked if I'd make her one, too.  She took me out to lunch a million-and-one times in exchange - which was fine with me. :)

As you can see, I based the stripe and dash pattern on the fabric I chose as a lining.  I love the blues in the fabric.  I just happened to have just enough teal yarn left over from another project to use for this handbag.  Yay for stash-using.

I have a thing for stripes in a big way.  It's totally accidental.  I never think about it, I'm just drawn to them.  Years ago a friend pointed out that over half the shirts hanging in my closet had horizontal stripes on them ... I'd never noticed.

I didn't make a label for this handbag because I never told Barb about my craft blog.  In fact, I never told anyone at that job about it.  Is that weird?  Do any of you not-tell certain people about your craft-blog-self?
» read full post

Friday, July 27, 2007

Shop Update

I just added this small birdcage handbag to my shop. Yay!

The two bleeding heart handbags are still available.  Just letting you know because they might not have been there if you looked in the store.  Almost every night someone "buys" both of them ... but never pays for them.  That means the store is empty until I put them back.

Have any of you had problems like this with their web store?

I have now officially updated my store 100% more than I did last year. That's double!  I hope I keep it up.
» read full post

Sunday, July 22, 2007

Handmade Shop Open

I have a new shop here on my site to sell handmade items.  There are two Bleeding Heart Handbags in my shop right now.

I added a link to the store, "handmade items," on the right under the header "Buy my stuff."

I'm pretty excited about selling directly on my site.  I've been working hard to get lots of handbags and wristlets finished.  I'll announce additions to the store here on my blog.
» read full post

Sunday, July 01, 2007

Pulling Threads To The Back

In the last day or so I stumbled across a blog post where the person was talking about quilting.  Instead of back tacking, she pulls the loose thread ends through to hide them.  I tried to find the post, but it's not in my Bloglines archive - any of you know who it was?  I'd love to link to the post. **Edit:  Alex is right, it was Pink Chalk Studio.**

My reaction was, "WHAT?!?"  The "what" was half "why didn't I already know about this?" and half "OMG! I wish I'd never learned about this."  I realized right away that there were going to be countless instances when I would *have* to pull my thread end through because back tacking would no longer be OK.

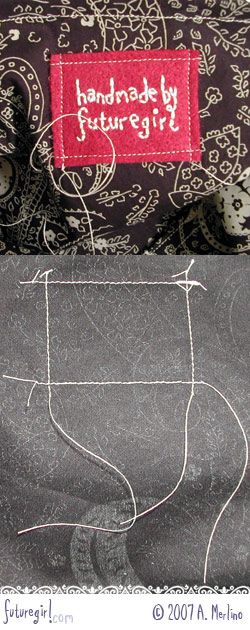
Today I'm working on a purse, and I was back tacking the day away *until* I got to the label.  This is the first time I've ever pulled my thread ends through.  This is what I did:

1) Leave long thread ends at the start and end of each stitching line.

2) Thread a needle with a thread end on the front of the piece and pull it to the back of the piece.

3) Hand-tie the front and back thread ends on the back of the piece.  Trim.

Below you can see the (terrible) before and after photos of the corner of a label with back tacking and today's hand-tied label.  It makes a *huge* difference. The "before" isn't that bad, but it's not as clean and smart looking as the "after" label.


» read full post

Wednesday, June 06, 2007

Nautical Handbag

Elizabeth, a wonderful repeat customer, who blogs at Crafts of Destiny contacted me months ago (March, actually) to commission a handbag for her Mom's birthday in June.  She gave me a couple themes to choose from and asked me if I would like to design something.  The nautical theme captured my imagination right away.  After doing some google searches, I discovered that nautical flags actually stand for letters.  Part of me thought it'd be really cool to spell something out in nautical flags - like a secret message for sailors.  Another part of me thought I was out of my mind.  When I emailed Elizabeth about the idea, it was exactly what she already had in mind - perfect!

The flags spell "Margaret," which is Elizabeth's Mom's name.  I cross-stitched on 22count Hardanger (I didn't make the smallest possible X, but I liked the tighter weave of the 22-count fabric).  Originally, I wanted to use metallic gold where the light blue is, but the metallic floss was a bitch to use.  It pulled funny, broke apart, and was generally finicky.  It also didn't look as cool as I thought it would as the ground for the flags.

I made a simple felt square keychain to match.  Anchors are a great nautical image, and it was fun stitching this little one.

Now that I've become familiar with nautical flags, I'm seeing them everywhere.  Even though I only know the letters m-a-r-g-e-t, I can figure out words sometimes.  Last time we drove to the shore*, I realized the flags flying across the roof of the Atlantic City Convention Center spelled "Atlantic City."  I'm so smart! ;)

*In South Jersey (or the southern part of New Jersey, as everyone else would say), the beach is not the beach, it's the shore.  You even see this on the highway signs when driving south out of  New York.  There are all sorts of exits for "Shore Points,"  meaning cities along the coast.  I've lived a lot of different places in this country, and I always enjoy learning the colloquial language of an area.  It helps me feel at home.


» read full post

Tuesday, March 13, 2007

My Very Own Handbag

The handbag above is mine, all mine.  I *love* this handbag.  If you make stuff (and if you are reading my blog, you probably do), I suggest you make one (of whatever it is that you make) for yourself.  It feels so good to spoil yourself the same way you like to spoil other people.

I'm not a handbag connoisseur.  I like having a cute purse, but I usually buy cheapies from Claire's or Target.  The only reason I made myself this bag is because my last one was starting to come apart.  It was just too ridiculous for me to buy another $15 purse when I freakin' make purses.

I modeled my handbag after the one I created for Bitter Betty.  Instead of the anatomical heart cameo, I decided on the three blood drips.  My concept here is Asian Horror Movie ... which is why the blood is dripping *up* the purse.  I left the drip ends open, like I did on BB's handbag. I like that the blood drips kind of resemble simple flowers.  I also like how they look a lot like this awesome Alexander Henry fabric that I'm seeing on everyone's blog.  I *must* get some of that fabric!

Not only is it nice to spoil yourself, but now that I'm carrying around one of the handbags I sell, I can see first hand how it performs in the real world, which is invaluable information.  You can see that the handles have stretched a little after weeks of use, but they still are in proportion - thank goodness.

I put a pocket in my purse that is split into a 4" pocket for my cell phone, a 3" pocket for my headset (I put lotion in it for the picture), and a 1" pocket to hold a pen. (Sorry Bethany, I didn't think of the pen thing for yours.)

Just for fun, I thought I'd show you what is in my purse.  Let's see ... my organizer, my wallet (with blue paint chip tucked in the front pocket because I liked that the color was named "Confidence"), lip gloss, sunscreen lip gloss for car trips, ear plugs for live shows (the purple things in their carrying case), cough drops, cinnamon Listerine strips, hand sanitizer, lotion, a pen, yarn scraps in a zip lock for fabric matching (sticking out of the organizer), tissues, mace, and spiked brass knuckles (on the left, under the keys).  You probably shouldn't sneak up on me if you recognize me on the street.
» read full post

Saturday, March 10, 2007

WIP - Dustpan Alley Bags

I've finished embellishing the birdcage and flower handbags that I'm making to send to Dustpan Alley.  Earlier this week, I finished embellishing the three teal bags.  Six of the nine "handmade by futuregirl" labels are done.  Next I need to cut, sew, and install the linings.

I've been working on the bags assembly line style: cut 8 flowers, sew flower details, attach stems, etc.  It's so much fun for me.  If I could make a living working on a factory assembly line, I would.  I actually did work on an assembly line for a while in college making gas filters on the graveyard shift.  It was very satisfying work.  It just doesn't pay diddly squat.

When I made my first small flower handbag,  I ad libbed the stems.  Afterwards, I made a chart of exactly how they looked.  Thank goodness I did!  It would have taken so much longer to do all the stems without it.  Tonight I added the chart of the three flower cluster I used on the medium and large handbag.
» read full post

Friday, February 23, 2007

Dreamy

This handbag, for Bethany of Bitter Betty, started as a dream. I awoke one morning with the image of a cream and black striped bag floating in my head. It'd been months since I decided to make her a handbag, and I'd been waiting for the perfect inspiration.

I was so excited that I immediately started crocheting her bag even though I didn't have the whole thing planned out. I don't know if it was Valentine's Day or Bethany's interesting inclinations (or a combination of the two), but as the stripes were forming, I decided to add an anatomical heart cameo.

To create the cameo, I did a Google image search for hearts, and then I made many, many sketches. I traced my design onto tear-away stabilizer, embroidered it on the felt, and then cut out the oval. The oval is edged in French knots. If I had any cream lace, I probably would have trimmed the oval with it. It's for the best that I didn't, because I never would have added the blood drips if there was lace. And I totally dig the blood drips.

Once the handbag was crocheted and embellished, I started to worry. I had no lining fabric. Usually, I start with the fabric and work backwards. I didn't need to worry, because on an impromptu trip to the fabric store, this beautiful tan and black paisley fell into my arms.

This fabric has become my favorite. It seems like I always fall madly in love with my most recently discovered fabric. Does that happen to you, too? I love all my fabric, but I just about swoon every time I see this paisley. Below is the repeat, which is about 11.5 inches. It's a large, bold print.

I also decided to add simple interior pockets.  I'd been wary of trying pockets, but they turned out perfectly.  This is absolutely my favorite handbag so far. It was a fun, easy bag to make for a wonderful, dear friend.


» read full post

Tuesday, February 13, 2007

Crochet Wristlet

Ester emailed me in November and asked if I would make a wristlet for her.  Of course!  Luckily, I knew how crazy my schedule would be, so I warned her it would be done after the new year.  See, I'm right on time.

I love wristlets.  I was very afraid of the whole zipper thing.  It took me four tries to get the zipper exactly how I wanted it.  I was so happy when I finally did it, that I sat there ZIP. ZIP. ZIP. for about 5 minutes saying, "Hey, look, a zipper!"

I like the crochet strap because it's soft against my wrist and it's stretchy, but it twists up a little when it's off my wrist.  I'm thinking about making next one with a fabric strap that matches the bag lining.  What do you think?
» read full post

Thursday, February 01, 2007

Made Especially for Green Kitchen

Michelle of Green Kitchen is one of my favorite craft conspirators and a good friend.  After she sent me this this wonderful package, the least I could do was make her a bag.

This bag is totally different from all the others I've made, and I had a great time designing it for her.  I actually made Michelle's bag before the one for my mother-in-law.  I loved using my brand-new-for-my-birthday fabric to make a gift.

Since she has a baby to carry, she needed something hands-free.  She sent me a sketch with dimensions, which totally helped me out.  The strap is long enough to wear across her chest.  I was afraid that the cotton yarn would stretch over time, so I made the strap adjustable.  It loops through a rectangle ring and then attaches to itself with three buttons that slip right between the strap's stitches.

The three decoy buttons on the outside of the strap stabilize the functional buttons.

No one sells 1.5 inch rectangle rings, so I liberated one from an unused backpack.  I couldn't even find them online.  If you know where I can get them, please tell me, because they are the perfect size for all sorts of uses.

I crocheted a removable cell phone holder that hangs from the rectangle ring, and there is a key hook attached to a long strap.  I made the key hook strap long enough that the keys rest on the bottom of the bag so their weight won't pull down the top edge of the bag.

I was afraid that my normal felt and embroidery floss embellishments wouldn't be tough enough to withstand the reality of errands with two little ones, so I tried something new.  I used cotton yarn to embroider in the spaces created by the single crochet stripes.  I love the way it turned out, and I have plans to use the technique again.

I totally took a chance that Michelle would like the kooky fabric and crazy embellished stripes.  The fabric is so enthusiastic and bold, and that's how I picture Michelle.  And, from a fashion standpoint, with so many colors it would equally match (or not-match) everything.  I love thinking about her running around town with a bag I made for her.
» read full post

Sunday, December 10, 2006

Handbag - 7 of 7

This is the last of the 7 handbags I made for my mother-in-law to give as holiday gifts to her employees (and a niece).


When I bought this yarn, I had no idea what I was going to do with it.  I just loved the color.  Actually, that's how I buy most of my yarn.  So one day I took all these different colored strands of yarn to the fabric store and tried to find matching fabric to use as linings.  When I found this burst fabric, I about freaked.

First of all, I'm silly for dark grey.  It's one of my favorite colors.  So, to find a fabric with a dark grey background was cool.  When you add  bursty flowers in blues, electric lime green, and white, it becomes irresistible to me.  This is another bolt that I pulled off the shelf and dragged around the store so no one else could take it.

Strangely, there is no absolute teal in the fabric when you get up close, but somehow it matches the yarn perfectly.

At first, I tried embroidering directly on the handbag, but you really need the dark grey background to make those colors pop.  The lime floss was just swallowed by the teal yarn.  As you can see, I ended up cutting out charcoal felt circles and embroidering on them.  In the middle of the two big circles are stitched-on  sequins.  Then I added in some of my favorite sequins  to balance everything out.

Doing this seven handbag commission for my mother-in-law was a great learning experience for me because I discovered several things:

-- I have a much more solid feel for what does and doesn't work for me.  I'm going to be much more confident when picking out fabrics and choosing embellishments in the future.

-- Making and selling these handbags feels good in a way that most jobs never will or could.  I am going to do everything I can to keep this part of my life growing.

-- Even though I have a full-time job, I can get a ton accomplished when I'm focused and motivated.

Completing this craft-challenge has given me the determination to be more ambitious.  I'm excited about my crafty plans and I can't wait to see where all of this leads.
» read full post

Thursday, December 07, 2006

Handbag - 6 of 7

I love this fabric.  When I saw it, I immediately grabbed it off the shelf and carried it around the store until I bought all that was on the bolt.  Sadly, there was less than two yards left.

I love graphic, flat-color designs.  I love brown and orange and red and cream and weird mossy green.  I love leaves with curlicue veins and flowers with spots and bursts.  I LOVE this fabric.

It's a thick fabric (bottom wieght, maybe?) that has a tiny bit of stretch (I'm guessing 1% lyrca or spandex).  This makes it very nice as a purse lining.  It feels sturdy and durable.

The fabric made embellishing the bag super easy ... I have about 20 cool looking flowers and leaves to choose from.  When I dropped off all the handbags, my mother-in-law picked this one up and said, "I want one of these. A large one." :)

I know exactly how she feels.  I'm going to make one of these for myself, too.  I have my summer-walk bag, but I need one of these for everyday use.  Oh, I can't wait!


» read full post

Tuesday, December 05, 2006

Handbag - 5 of 7

This bag was already finished when my mother-in-law made her order for seven bags.  I'd planned on listing it in my Etsy shop, but I ended up setting it aside for her.  Luckily, I have lots of the birdcage fabric, so I will be able to make plenty more for the shop.

The birdcage bags are the most popular ones, by far.  Everyone seems to love them.  I'm stunned by them, too.  They look exactly how I want them to look.  I love it when that happens.

I've tried to make a bunch of different bird shapes on the bags I've made.  I built up a little library of bird body templates.  This bow-legged cutie is one of my favorites.


» read full post

Wednesday, November 29, 2006

Handbag - 4 of 7

This bag is lined with paisley fabric, and I originally planned on adorning it with paisleys.  But, after the purple paisley insanity, I decided to try something else.

The fabric has great, simple graphic flowers on it.  I found myself doodling at work (that's the back of a client questionnaire - see the doomed paisleys?).  I picked the two sketched flowers (under the bags) to put on the bag.

First I attached the sage yarn with embroidery floss. Then I created circle flowers like the ones in the fabric.  I was on the fence about them - something didn't seem right.  Quality Control (aka Andrew) helped me decide to nix them when he said, "I think it's staring at me.*"  He saw the flowers as google-eyes and the stems as a nose.   Alrighty then ... back to the drawing board.

I still wanted to go with flowers.  As a test, I traced the top of a spool, cut the petals freehand, and embroidered the centers on two flowers.  They were perfect, so I ended up using the test ones. Yay!

It's funny that using simple, normal flowers makes me feel a little guilty, a little like a slacker.  I always feel like I need to kick it up a notch or I'll look unoriginal or lazy.  Not just in crafting, but in life in general.  I was the girl who always did all the extra credit homework - and loved every second of it.  But sometimes, simple and normal is exactly what is called for.

The brown of this yarn is very rich and warm.  I really like it.  I only had a fat quarter of the maize paisley, so I'm going to have to hunt down a bolt of this stuff, because I love it paired with the brown yarn. They are like chocolate and caramel.

* I want to take the opportunity to say that Andrew is my biggest source of encouragement.  He's the first person to see my stuff and is always supportive and helpful ... and, even when he accuses my bags of having google-eyed stares, it's with a smile.
» read full post

Tuesday, November 28, 2006

Handbag - 3 of 7

This purple handbag was made from the yarn left over from the super bad bag.  I don't usually go for lavender, so this color presented a challenge to me.


The paisley lining matched perfectly, so I thought I would go with paisleys for the outside.  Ugh, they just didn't look right on the bag: too many purples, no color harmony going on, and the tiny paisleys looked microbial and contagious.  On their own, they are supercute, sadly I made them too late to send off for the embroidered patch swap.

Next, I started a super elaborate paisley, thinking the microbial thing was the problem.  A couple hours into the stitching (no joke) I started to panic because I didn't have the time to spend hours and hours on one (one!) paisley.  Plus, I was starting to have second thoughts about the colors and the purple felt backing.

Freak out time.  What the hell was I going to put on this bag?  I pulled out my "stuff to put on other stuff" drawer and started to sift through the sequins, beads, and ... stuff.  That's when I stumbled across these sequins ... again (I used them on the aqua bag, too).

The Story of the Sequins

I rescued these sequins from a sweater I bought last year.  They were cute on the sweater, but my long hair was constantly getting tangled in them.  I carefully cut them out of the sweater and saved them (like the little hoarder I am).  Now they have become my absolutely favorite sequins and I can't find anything like them at the store.  My casual hunt is going to become a determined and focused hunt as I use them up.  If anyone has sequin finding tips, let me know.  I've already scoured AC Moore, Michael's, Joann's Superstore, and Pearl.

Attaching the sequins to the handbag was super easy.  Three rows looks great to me.  The turquoise/pink shimmer on the lavender yarn is really pretty and it matches the lining fabric really well, too.  Glittery, yet subtle.

I'm drawn to Earthy, Autumny, Deep Jeweltone colors. As a green-eyed, redhead who was born in October, those are the colors that make sense to me.  Eventually, when I have more time to play around, I want to explore color combinations that I'm not comfortable with (lavender, pastels, bright colors).  It always seems like people do the neatest and most inspiring work when they reach out of their depths.  Of course, I could also end up with Springtime Handbags that come with their own antibacterial hand wash.
» read full post

Sunday, November 26, 2006

Handbag - 2 of 7

This is the one Mini Handbag of the bunch.  I originally made a yellow one, but I didn't have the right fabric to go with the yellow.  I thought a trip to the fabric store would do more to harm my deadline than just making another in ecru.

I decided to line this one with the freaky stripe fabric, but I was afraid that elaborate embroidery would overwhelm such a small handbag.  I decided to embroider simple, multi-colored dashed lines across the top of the bag.  Next time, I'll make sure to put the yellow yarn on a bump-row, because it's a little swallowed up on the valley-row.

I like the effect of the alternating dashes, and all the colors hint at the crazy lining.  This one is going to be a gift for my young niece.  I think she'll love it.

In this last picture, you can see the crisp bottom corners of the lining.  After I sew the square bottom, I iron on stiff stabilizer. Not only does the stabilizer flatten out the bottom of the handbag, but it helps the lining fill-out the bag instead of looking loose and bunchy.  It's a small thing to do, but it makes a big difference.
» read full post

Wednesday, November 22, 2006

Handbag - 1 of 7

All seven handbags are finished and ready to go to Thanksgiving dinner with us tomorrow at Andrew's parent's home.  I know! ... I can't believe it either. :)

I'd like to thank my mother-in-law (the. best. ever.) for commissioning these handbags.  It was great to have the freedom to try a bunch of different and new things without having to worry if they'd sell.  Because of this project, as I go forward, I'm going to be more confident in my fabric choices and embellishment designs.  Thanks, Elaine!

This is handbag 1 of 7.  The designs and colors in the striped lining fabric are way-crazy.  It's overwhelming - in the best possible way.  When I first got it, I cut a strip the length of the repeat (24 inches) and I just stared at it for days while I worked on other crafts.  Each stripe is mesmerizing, ecstatic.  It's every curtain, wall paper, rug, and embroidered dress I had growing up in Kansas - all rolled into one fabric.

I was tentative about making a striped bag.  Especially with such a crazy color combo, but I plunged in.  Then, it just seemed right to use the yarn, itself, to do the embellishments.  I did a fairly simple cross-stitch-y design that echoes the fabric.

If I actually try to think about the color combination and the stitching, I start getting lost in all the colors and stripe widths, but when I just look at it, it looks *right* to me.  I love it.  I can't really explain why.


» read full post

Monday, October 23, 2006

Bag Photo Shoot

I finished one of each size of my bags in ecru cotton yarn so I could do a comparative set of photos.  I think the ecru works perfectly for generic product shots (i.e. "This is a Small Bag"), so people don't get hung up on the color or the embellishment.

Starting from the left, Mini, Slim, Small, Medium, Large.  The Slim bag is in half-double crochet and is flat when it's empty.  The rest of the bags are in single crochet and have flat bottoms so they easily stand on their own.

Andrew picked up a huge roll of white paper (25 yards of 36" wide Sign Writers Bond, 20lb.) that works perfectly for a backdrop.  We took a bazillion group and single photos.  I'm really pleased with them.  Next step, photo editing.

Yesterday we went to dinner at the best steakhouse in South Jersey with Andrew's parents.  I'm not a big meat-eater, especially when there are bones involved, but I absolutely *devour* the end-cut prime rib at The Library.  At dinner, I got my first bag commission from my mother-in-law: 7 bags to give as Holiday gifts!  I'm determined to get them done by Thanksgiving.  I've already started making them.
» read full post

Sunday, August 20, 2006

Large and Medium Bags

The tiny bird bag is all grown up. I've been crocheting up a storm.  The large bag is 13" across at the top, 7.5" high to the bottom of the handles, and 3.5" deep across the flat bottom.  The medium bag is 11.5" across at the top, 6" high to the bottom of the handles, and 3" deep across the flat bottom.  I'm working on a small version right now. They'll be like a set of Russian nesting dolls.

I like how the flat bottom helps create a roomy interior.  I bought some stiff interfacing to use on the bottom of the lining to help keep the bottom flat, at least when you set the bag down.  That's the plan anyway.  I'm not sure how well it's going to work.

I wanted a more angled handle on these bags, instead of the slit handles you see on my smaller bags.  These angled handles turn at the top so, where you hold them, they lay flat.   I figured out a way to do it as I crocheted, though, so I wouldn't have to attach the handles.

I've become sorta insane about the whole 'not wanting to join crochet pieces' thing.  I'm completely obstinate.  I've spent a ton of time crocheting bits and pieces just to figure out how to make a seamless bag or an integrated turned handle.  Intellectually I know that I could be spending that time perfecting my joining skills, but I *absolutely do not* want to join crochet pieces.  Just thinking about doing it makes my face scrunch up.

The side-benefit of my willfulness is that when I finish the last stitch of the bag, I'm done.  Well, except for the lining.  It's great to clip the yarn, weave in the end, and have a bag sitting before me.  I guess I'm crazy like a fox.
» read full post

Thursday, August 10, 2006

The littlest birds, sing the prettiest songs

This tiny seamless bag is in single crochet.  It measures a mere 4" wide, 7" tall, and 3" deep.  I engineered a new "single crochet no-seam" technology, so this one has less of a bump at the slip stitch join than the Super Bad bag.  I used single crochet to make the bag more rigid to help it stand up on it's flat bottom. Single crochet also produces a relatively flat ground for embroidery and applique. For the embelishments, I more or less just copied the bird cage and bird from my new uber excellent bird fabric.  The little bird came out unbelievably cute!

Being a prototype, I made it tiny.  It's easier to frog a tiny bag over and over (and over).  Plus, I was obsessively counting each stitch during the flat bottom development so I wouldn't wank up the corners of the rectangle.  If there are too many stitches to count, I end up having to count out loud so I don't lose my place.  Am I the only person that skips double numbers (like 33) or jumps ten numbers (28, 29, 30, 41, 42)? Probably.

The bag isn't lined yet ... it's barely big enough to hold a soda can, so I'm not sure how practical it is.  I'm definitely going to make a human sized bag.  I think it would be cool to line the bag with the bird fabric.   I'm also dreaming of a zippered pouch/wallet to match, but the idea of tackling zippers - ugh.

If anyone knows about any great zipper tutorials or zipper help, let me know (I'll be googling when the time comes).  I can get away with not joining crochet pieces, but I won't be able to avoid zippers forever.

- - - - - - - - - - - - -
P.S.
The title of this post, The littlest birds sing the prettiest songs, is borrowed from a Jolie Holland song. She is incredible. Her music is described as "spooky American fairytales" - I couldn't have said it better.  I encourage you to at least give her a listen.
- - - - - - - - - - - - -
» read full post

Sunday, July 23, 2006

Super Bad Bag

What did I do when I found this cigarette ad tucked inside a book at a thrift store:

1) Ask myself why I was flipping through the Woman's Day Encylcopedia of Cookery (Vol. 9 Pec-Pur) from 1966?

2) Notice that the back of the ad was full of winning recipes from a 1972 soul food bread contest and bake up a storm?

3) See the crochet vest on the foxy babe and think to myself, "I could make that!"

You probably already know the answer to this question. I'm glad that the sweater didn't work out, because I would have had a hell of a time finding matching lime green tights.

In a testament to my whim of iron, I have created one super bad bag!  The bag is in single crochet and was made in one piece like my crochet purse (no seams!). The letters are cross-stitched on the front. Color changes were made using separate skeins of yarn. While crocheting the chevron, I looked like a crochet-machine with 5 different skeins feeding into my hands.

The words "Super Bad" have a different connotation depending on whether you see the design as superhero-y or cheerleader-y, but either way it's a crack up.  The whole thing is so ridiculous, which is my favorite part.

The bag is the perfect size for a magazine and a bottle of water for the park ... or maybe a Japanese stuffie book and some sewing supplies. I need to find a super bad fabric to go inside.  I thought about using my super cool girls fabric, but the blue doesn't look right with the lime and purple.  I'll post when I find a matching fabric and get the lining made.
» read full post

Wednesday, June 28, 2006

Seamless Crochet Purse

This purse has been in the works since I finished the clutch.   I've been on a mission to design a better purse. Now that I've finally finished it there are so many things I want to talk about.  I should have been blogging about it at every step so there would be several shorter entries instead of this long monster ...

Seamless Design

As I mentioned in May, I do not like joining crochet pieces, especially when one side is upside down.  I decided to come up with a seamless purse.  Countless swatches, prototypes, and complete failures were produced over a couple weeks while I tried to come up with a way to crochet my purse without seams.

I didn't use in-the-round because the fabric is twisty and doesn't lay flat like I want it to.  I finally came up with a back and forth system (like you would normally crochet) where I joined the ends of the rows as I crocheted. The 'seam' part is on one edge of the bag and is barely distinguishable from the rest of the stitches.  I've never seen this in a crochet pattern.  Does anyone know if this is a common crochet techique?  If there is already a right way to do this I would really like to know.

Compact Shape

The shape of the clutch is long and shallow.  The problem with that is it hangs crooked in your hand if the contents aren't perfectly balanced on each side. My purse is just a little wider than the handle so it never hangs crooked.  Since I lost a little space horizontally, I made the purse a little deeper.


Where the hell are all the owls?

The third dilemma was embellishment.  The owl on my clutch kicks ass.  I love that owl. I went to every thrift store in the Philadelphia area looking for crazy-old-lady jewelry to embellish more bags.  I found nothing. No owls. No cats. No peacocks. No ladybugs. No leopards. Nothing.  So sad.

One day, after visiting a particularly oogie thriftstore, Andrew suggested that I embroider "something cool" on the bag.  He recently saw some work by Ghada Amer (she doesn't seem to have a site - google her to see some of her great art).  She embroiders on paintings.  Very cool.  I thought it was a great idea, but I wasn't sure how embroidering on crochet would look.  Then I remembered that Marci embroiders on crochet all the time.  I tried some radical, weird designs like Ghada's, but I couldn't get them to look good.

I love the way the branches and blossoms came out.  I'd spread out a bunch of different sequins on the purse over the branches and asked Andrew which ones he liked best.  He said, "All of them."  And he was right. :)  The circles are really cool.  They are transparent with an iridescent sheen.  As the purse moves they look like leaves flickering in the wind.


Finishing

I used a purple paisely cotton for the lining.  I hand-sewed the lining into the purse and added a single sew-in snap to secure everything.  It's the right size to hold my wallet, keys, cell phone, and some other odds and ends.

I was so pleased with the purse that I made a new home for my owl.  This is the purse I use on our almost-nightly 2-hour walks (no kidding).  I really wish there was a craft I could do while we walk.  Since there are no walking-crafts, I entertain myself by trying not to fall into holes, making up funny names for the people we pass like "Mr. McStinkles" or "The Squinty-Eyed Shuffler", and, on extra hot nights, getting a freezing cold water ice (yum!).


whipup

» read full post

Friday, May 19, 2006

Crocheted Clutch

See that owl? It was part of a necklace I bought on the sidewalk last weekend. It's a three-piece articulated owl that I just couldn't pass up, even though it's way too big to wear as a necklace. When Whipup announced that last week's Whiplash theme was yarn, I searched through the projects in The Happy Hooker. The clutch on page 136 caught my eye. It is cute, easy, and a perfect home for my newly acquired owl. I wasn't fast enough to make Whiplash, though.

It took me no time at all to crochet the bag using sage colored cotton yarn. It's just one rectangle with slit handles. The side seams are a little tricky. You can't match the rows one-for-one because the back side rows are upside down when you fold the rectangle in half. My bag ended up an inch or so wider than the one in the book, so I adjusted the dimensions fabric lining a little and added in a little extra to create a cell phone pocket.

I used the decorative diamond stitch for the top seam of the fabric liner. I love the way it looks on the striped fabric. The fabric is from an old dress shirt of Andrew's. I machine sewed a seam through the middle of the fabric pouch then hand sewed the edges to create the divider for the cell phone pocket. I hand sewed the liner into the purse after attatching the owl.

There is just enough room for my cell phone, my wallet, and my keys.   It's the perfect little  purse.
» read full post