Sunday, July 1, 2007

Pulling Threads To The Back

In the last day or so I stumbled across a blog post where the person was talking about quilting.  Instead of back tacking, she pulls the loose thread ends through to hide them.  I tried to find the post, but it's not in my Bloglines archive - any of you know who it was?  I'd love to link to the post. **Edit:  Alex is right, it was Pink Chalk Studio.**

My reaction was, "WHAT?!?"  The "what" was half "why didn't I already know about this?" and half "OMG! I wish I'd never learned about this."  I realized right away that there were going to be countless instances when I would *have* to pull my thread end through because back tacking would no longer be OK.

Today I'm working on a purse, and I was back tacking the day away *until* I got to the label.  This is the first time I've ever pulled my thread ends through.  This is what I did:

1) Leave long thread ends at the start and end of each stitching line.

2) Thread a needle with a thread end on the front of the piece and pull it to the back of the piece.

3) Hand-tie the front and back thread ends on the back of the piece.  Trim.

Below you can see the (terrible) before and after photos of the corner of a label with back tacking and today's hand-tied label.  It makes a *huge* difference. The "before" isn't that bad, but it's not as clean and smart looking as the "after" label.


Monday, May 7, 2007

Tutorial: Embroidery On Felt

When I started making handbags, I wanted cool labels.  I looked into ordering them, but I didn't like the standard options, and custom labels were way too expensive.  My solution was to hand embroider labels on felt.

I thought this would be a temporary thing until I could find labels to buy, but I've come to love the ability to customize each label to match it's handbag.  This technique also works well for patches like the anatomical heart cameo on Bitter Betty's handbag.

Because felt is so fuzzy, you can't trace an intricate design directly on the felt, nor can you iron-on an embroidery design (wouldn't acrylic felt melt?).  To get around this, I use tear-away stabilizer.

1) Cut out a 2-inch square of felt, a 2-inch square of stabilizer, and print out your design.

I have a 3" X 5" card with a 2-inch square cut out of it so I can just trace a square on the felt.  I've used my rotary cutter to make a ton of 2-inch squares of stabilizer.

2-inches square are the dimensions of my label, adjust the size for other designs.
2) Trace design on the stabilizer.

For word embroidery, I make sure the grain of my my stabilizer runs top to bottom because there are many vertical lines.  This makes the stabilizer easier to remove later.

I use .05 mm pen so the line is very precise and there is less ink to rub off on my floss.  I haven't found an ink that doesn't rub off yet.  I think it's because the stabilizer is plastic-y.
3) Pin the stabilizer to the felt.

The stabilizer is rigid enough that I can just hold it (no hoop necessary).  I take out the pins once part of the design is done because it doesn't slide around.
4) Embroider design.

Pull stitches tight, but try not to pull them through the stabilizer.  Note that I didn't pull too much floss through the eye of the needle.  The ink only rubs off on the floss where it folds through the eye of the needle, so when using light-colored floss, I'm careful to not pull too much through.  The 'dirty' floss becomes a part of the knot on the back and is never seen.
5) Remove stabilizer.

The stabilizer I use is for machine embroidery, so I can't just tear it away (I almost had a heart attack the first time I tried.).  I carefully trim away most of the stabilizer with manicure scissors and carefully pull it out from between the stitches with tweezers (these are two very useful craft tools).  This step requires patience and concentration.  I haven't snipped the design or yanked out a stitch yet (knock wood), but I'm sure I will eventually.
6) Your design/label is finished.

Yay!

Well, actually I trim about 1/4th inch off the top and bottom before I sew it into a handbag.

When my stabilizer runs out, I'm going to see if they have a lighter weight version that will be easier to remove, but I'm afraid my embroidery stitches will just pull right through a lighter stabilizer.  That would make it impossible to embroider because you can't really see the stitches through the stabilizer.

Recently, "Anonymous" commented saying she uses a similar technique with wax paper and a Sharpie™ (let it dry thoroughly).  When she's finished, she just crinkles up the wax paper and it tears away easily.  If I try it, I'll let you know how it works for me.

If you have any tips on making this process easier, please let me know.

Wednesday, January 17, 2007

Tutorial: Hand Sew Felt Using Whip Stitch

When you read this tutorial, my instructions might seem terribly obvious.  But if you look at the stitching on my first stuffie, you'd see it wasn't obvious to me. :)  Now that I've worked out a system, I'm able to jump right into my felt projects without having to labor over, and struggle with, the stitching.

For other options to hand sew felt see my blanket stitch tutorial and my post about choosing between whip stitch and blanket stitch.


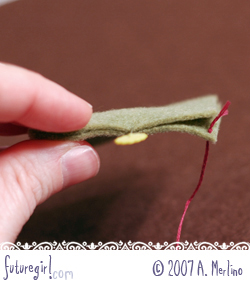
(1) Place the wrong-sides of the felt layers together and pin or baste them together.

Note One: All stitches should go in and come out about an eighth of an inch back from the edge of the felt.

Note Two: I used to struggle with knotting my floss, but Heather Bailey's Best Knot Ever Tutorial changed my hand sewing and embroidery forever.  Seriously.

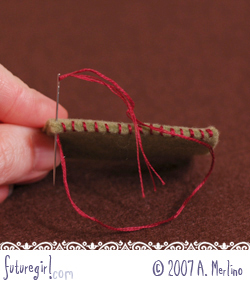
On the right-hand side, take your knotted floss and go from the inside of the bottom layer through to the outside. The knot should be sandwiched between the two layers with your floss coming out of the bottom layer.


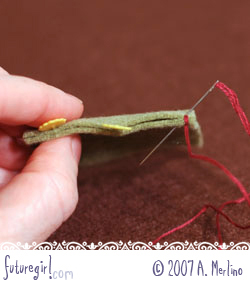
(2) Put the needle through the top layer exactly above where the floss is coming out of the bottom layer.  Push the needle through the original hole in the bottom layer.  Pull through both layers.

This stitch will help anchor the two layers of felt together to minimize slipping as you sew.


(3) Put the needle through existing hole in the top layer.  Put  the needle in at an angle so the point comes out of the bottom layer about an eighth of an inch to the left of the first stitch. Pull through both layers. This stitch will cover the first stitch.


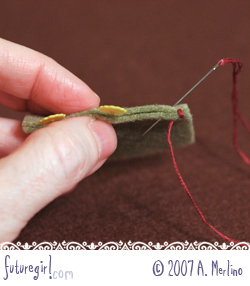
(4) Put the needle through the top layer above where the floss is coming out of the bottom layer. Put the needle in at an angle so the point comes out of the bottom layer about and eighth of an inch to the left of the previous stitch. Pull through both layers.
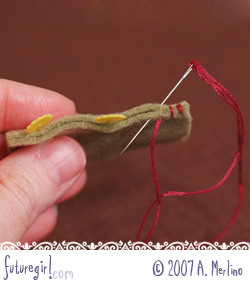

(5) Repeat across.


(6) When you make your last stitch, put the needle through the top layer above where the floss is coming out of the bottom layer. Push the needle through the last hole in the bottom layer.  Pull through both layers.


(7) Put your needle through the last hole in the top layer so the needle point is between the two layers of felt. Pull through.  This stitch will cover the last stitch you made.

[FOR A CLOSED SHAPE - Put your needle in through the last hole in the top layer so the needle point comes out of the seam between the two layers next to the last stitch.  Pull the needle through to the outside of the piece.]


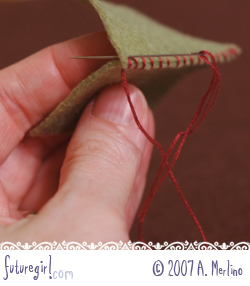
(8) On the inside of the two layers of felt, put your needle under the last stitch.

[FOR A CLOSED SHAPE - Put your needle's point back through the seam and catch an inside diagonal stitch.  Sometimes I leave the last inside diagonal stitch a little loose so it's easy to catch. If you can't catch an inside diagonal stitch, you can put your needle under one of the outside stitches.]


(9) Wrap the floss around the tip of your needle two times, and pull the needle through to create a knot on the inside of the two layers.

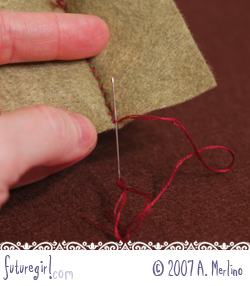
[FOR A CLOSED SHAPE - Whether you caught an inside stitch or an outside stitch, after you make your knot, put the needle in through the seam and pull it out somewhere else on the piece.  Tug on the floss a little to pull the knot through the seam to hide it. ]


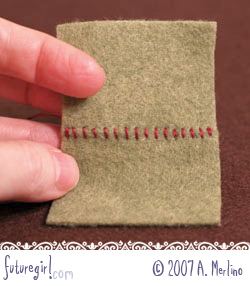
(10) Pull the pieces apart to flatten the stitches.

When making a stuffie, put about 2 times the amount of stuffing that you think will fit in your piece.  As long as you aren't misshaping your stuffie, keep adding stuffing. Tightly packed stuffing pulls the pieces apart so the stitches will lay flat.  Also, the tighter you stuff your piece, the less lumpy it will look.

Tuesday, September 5, 2006

Tutorial: Paper Clip Stitch Markers

I've been using vinyl-coated paper clips as stitch markers for years.  At first it was out of necessity.  I just grabbed some while I was crocheting. When that project was done, I tucked them in with my hooks, so I kept using them.  I've lost some here and there over the years, so I thought I'd treat myself to some grown-up stitch markers.

I was shocked to find out that stitch markers cost about 12 cents apiece for about .003 cents worth of plastic.  That's ridiculous.  Especially when I can find vinyl-coated paper clips just about anywhere for cheap.   Even though I'm thrifty, I probably would have just plunked down the $3 for 24 stitch markers, but they had little plastic knobbies on them that would catch on the yarn when you mark a stitch.  Come on!  Couldn't they at least make the edges smooth?

I've decided to embrace my inner cheapskate and add to my paper clip stitch marker stash.  For all you thrifty chicks who want some inexpensive, colorful stitch markers, here's how I make them:
First, I squish the interior loop so it is tighter.
Second, I bend the interior loop so it's closed.
Third, I angle the interior loop so its tip is centered.
Fourth, I bend the exterior end in so it rests tightly against the interior loop.  This works best when I bend it a little too much inside first, then adjust it so it rests tightly against the interior loop.
Fifth, At the point where the exterior end touches the interior loop, I bend the interior loop down a little.


After the modifications, I can hold the end with the interior loop facing down and easily thread the interior loop in/under a stitch.  Because I closed the exterior loop, the paper clip won't fall off easily.


You can find vinyl-coated paper clips in a ton of cool colors and sizes for super-cheap.  I even have some funky striped ones. You could use metal ones, but if you are like me and leave projects sitting, sometimes for months, metal ones could rust and mar your yarn.  I've never had a problem with the vinyl-coated ones, and I've been using some of them for over 10 years.


Sunday, August 20, 2006

Large and Medium Bags

* * * * * *
UPDATE:
The pattern for the Starling Handbag is now available on the free downloads page.
* * * * * *

The tiny bird bag is all grown up. I've been crocheting up a storm.  The large bag is 13" across at the top, 7.5" high to the bottom of the handles, and 3.5" deep across the flat bottom.  The medium bag is 11.5" across at the top, 6" high to the bottom of the handles, and 3" deep across the flat bottom.  I'm working on a small version right now. They'll be like a set of Russian nesting dolls.

I like how the flat bottom helps create a roomy interior.  I bought some stiff interfacing to use on the bottom of the lining to help keep the bottom flat, at least when you set the bag down.  That's the plan anyway.  I'm not sure how well it's going to work.

I wanted a more angled handle on these bags, instead of the slit handles you see on my smaller bags.  These angled handles turn at the top so, where you hold them, they lay flat.   I figured out a way to do it as I crocheted, though, so I wouldn't have to attach the handles.

I've become completely obstinate about the whole 'not wanting to join crochet pieces' thing.  I've spent a ton of time crocheting bits and pieces just to figure out how to make a seamless bag or an integrated turned handle.  Intellectually I know that I could be spending that time perfecting my joining skills, but I *absolutely do not* want to join crochet pieces.  Just thinking about doing it makes my face scrunch up.

The side-benefit of my willfulness is that when I finish the last stitch of the bag, I'm done.  Well, except for the lining.  It's great to clip the yarn, weave in the end, and have a bag sitting before me.  I guess I'm crazy like a fox.

Sunday, April 16, 2006

Sasha the Seahorse

** UPDATE:  Sasha the Seahorse Pattern & Instructions PDF is available on my free downloads page**

Sasha is made of Limbo Lime felt, plastic pearl beads, periwinkle floss embellishment, and eyes made from a white sequin and a cooper-colored bead.

I approached the design of Sasha the same as Sigmund. I did a Google search for seahorses and studied all the different seahorse features. I never realized how truly bizarre these creatures are. The more you look at seahorses, the weirder they look, just like a word sounds weird if you repeat it over and over. Seahorses are very very elaborate, so I had to really pare down the design to basic elements. I used the periwinkle stitching and the pearl beads to mimic their exoskeleton-looking bodies.

Monday, March 20, 2006

Sigmund the Octopus

** update: This pattern is now available as a free download! **

This original stuffie is the culmination of 5 pattern pieces, 25 felt pieces, 50 beads, 52 sequins, and hours of sewing. Whew! I had no idea what I was getting myself into when I decided to design an octopus back in February. I was flying high on my easy success with the owls.   An octopus is a different story.

I have a yard of cream felt that I bought to do prototypes. There is a graveyard of weird cream arms and orbs in the lead-up to a fully recognizable octopus. The biggest challenge was the arms. I wasn't exactly sure what I wanted them to look like. The solution I came up with seems obvious now, but I didn't get it on my first try.

I also didn't work out what I was going to do for a face until I had the body and bespangled legs all sewn together. There were a couple of ways to go with the face. One is Japanese-cute wide-eyed and human-ish. I decided to go with inhuman, indifferent, google-eyed animal. Sigmund creeps me out. I imagine big sharp teeth hiding under all those legs. Why is he staring at me like that?!

I was so excited when I finished Sigmund. I wanted to honor him with a kick-ass photo shoot, so I bought that cool aquarium grass you see in the picture. I was hoping to find a cheesy treasure chest or goofy diver, too, but they only had realistic looking rocks and sea urchins and stuff. I was impressed. I almost bought one of those big undersea photos that you can tape on the back of your aquarium to use as a back-drop, but I thought that was going too far (... says the girl who just sewed a bazillion sequins on a small stuffed octopus ... ha!).

I am going to do a set of three original sea creatures. I like doing things in sets of three, like I did with the owls. I already have the next one's prototype done, and it's looking good. I going to keep it a secret for now, though. :)