Monday, May 7, 2007

Tutorial: Embroidery On Felt

When I started making handbags, I wanted cool labels.  I looked into ordering them, but I didn't like the standard options, and custom labels were way too expensive.  My solution was to hand embroider labels on felt.

I thought this would be a temporary thing until I could find labels to buy, but I've come to love the ability to customize each label to match it's handbag.  This technique also works well for patches like the anatomical heart cameo on Bitter Betty's handbag.

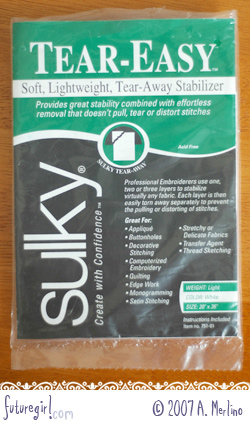
Because felt is so fuzzy, you can't trace an intricate design directly on the felt, nor can you iron-on an embroidery design (wouldn't acrylic felt melt?).  To get around this, I use tear-away stabilizer.

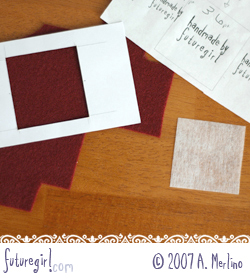
1) Cut out a 2-inch square of felt, a 2-inch square of stabilizer, and print out your design.

I have a 3" X 5" card with a 2-inch square cut out of it so I can just trace a square on the felt.  I've used my rotary cutter to make a ton of 2-inch squares of stabilizer.

2-inches square are the dimensions of my label, adjust the size for other designs.
2) Trace design on the stabilizer.

For word embroidery, I make sure the grain of my my stabilizer runs top to bottom because there are many vertical lines.  This makes the stabilizer easier to remove later.

I use .05 mm pen so the line is very precise and there is less ink to rub off on my floss.  I haven't found an ink that doesn't rub off yet.  I think it's because the stabilizer is plastic-y.
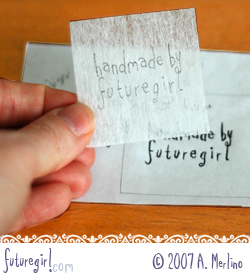
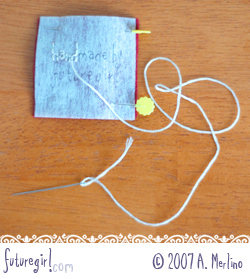
3) Pin the stabilizer to the felt.

The stabilizer is rigid enough that I can just hold it (no hoop necessary).  I take out the pins once part of the design is done because it doesn't slide around.
4) Embroider design.

Pull stitches tight, but try not to pull them through the stabilizer.  Note that I didn't pull too much floss through the eye of the needle.  The ink only rubs off on the floss where it folds through the eye of the needle, so when using light-colored floss, I'm careful to not pull too much through.  The 'dirty' floss becomes a part of the knot on the back and is never seen.
5) Remove stabilizer.

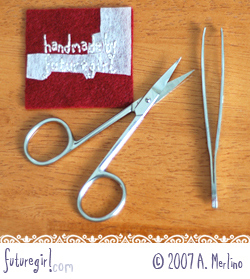
The stabilizer I use is for machine embroidery, so I can't just tear it away (I almost had a heart attack the first time I tried.).  I carefully trim away most of the stabilizer with manicure scissors and carefully pull it out from between the stitches with tweezers (these are two very useful craft tools).  This step requires patience and concentration.  I haven't snipped the design or yanked out a stitch yet (knock wood), but I'm sure I will eventually.
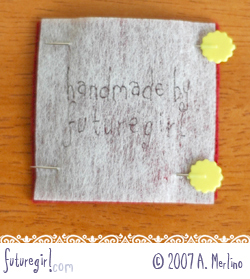
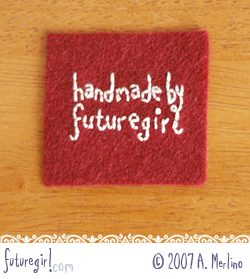
6) Your design/label is finished.

Yay!

Well, actually I trim about 1/4th inch off the top and bottom before I sew it into a handbag.

When my stabilizer runs out, I'm going to see if they have a lighter weight version that will be easier to remove, but I'm afraid my embroidery stitches will just pull right through a lighter stabilizer.  That would make it impossible to embroider because you can't really see the stitches through the stabilizer.

Recently, "Anonymous" commented saying she uses a similar technique with wax paper and a Sharpie™ (let it dry thoroughly).  When she's finished, she just crinkles up the wax paper and it tears away easily.  If I try it, I'll let you know how it works for me.

If you have any tips on making this process easier, please let me know.
108 Comments (comments are disabled)


Awesome post!

I had this in the line up for the Flickr Embroidery blog, but for material other than felt. I do draw right on wool and wool-blend felts without any trouble. I found out the hard way tonight that you can't do that on acrylic LOL
5/7/2007 11:10 PM

est said ...
i'd once did a picture embroidery using the same steps as you but i used a very cheap kind of paper, here we called it 'mahjong paper'. it tear out easily. i think it's like the one you used to pack the wristlet to me.
5/8/2007 12:30 AM

Cassi said ...
This is brilliant! I've always loved your labels - thanks so much for posting the tutorial :)
5/8/2007 1:13 AM

myra said ...
Brilliant! Thanks so much for sharing.
5/8/2007 1:14 AM

Blaize said ...
I just like it that the stuff is called "sulky." And then says "create with confidence." I can't create with confidence; I'm feeling too sulky.
5/8/2007 1:43 AM

macati said ...
Hi!
wow it looks great!
thank you
:)
manela
5/8/2007 2:26 AM

Carlene said ...
Your embroidered labels are so cool. Thanks for sharing this!
5/8/2007 7:32 AM

Frizz said ...
That's great using the stablizer. Thanks for sharing. I usually try to do it freehand and it comes out off.
5/8/2007 8:16 AM

stephanie s said ...
lovely tutorial, as usual. i think this would have worked very well for a project i did last year, will have to give it a try the next time around.
5/8/2007 8:37 AM

Lucy said ...
You are so clever. I wondered how you did that so perfect each time. Clever! Clever! I like to free hand things but then you end up with free hand results. Hee Hee. I will have to give this a try on some of the projects I have going. Thanks for sharing yet another of your great secrets.
btw... My mom got one of the first drafts of you Octophrost patterns and it is so much fun watching her make them up for her grandkids for this Christmas. They are just beautiful.
5/8/2007 9:04 AM

Mindy said ...
I've wondered how you do these tags, too... Thanks for sharing your craftiness :)
5/8/2007 10:09 AM

Belinda said ...
Thank you so much for the tutorial! Heaps useful! First time commenter on your blog, though I've been RSSing your feed for a few weeks now. Keep up the awesome job! Your craftiness hasn't ceased to amaze! :D
5/8/2007 11:20 AM

Fliss said ...
Oh, so that's how you made them! I did wonder. I admire your patience to make such intricate little lables (I'd want to stick them on the outside if they'd taken that long, lol!).
5/8/2007 11:47 AM

liz elayne said ...
Thanks for being generous in sharing this technique! I have been using a lightweight paper but this would be so much better (as the stitches pull through the paper sometimes).
5/8/2007 12:26 PM

kristin said ...
this is great!! thanks!

i've been asked how i stitch my lettering onto felt, and i never felt comfortable explaining that i simply write the word on PAPER and stitch through paper and felt..the paper then tears away easily...the problem i've encountered is that the paper is very slippery and thus requires tons of patience to get through a word while constantly making sure the paper is aligned correctly. i can see that this would not be an issue with stabilizer.

there is also something called "waste canvas" used for cross stitching on fabric. i've never used it but it's meant to tear easily away...just another option.

again, thanks for this great tutorial...you've done it once again!! :)
5/8/2007 12:35 PM

capello said ...
i gushy-gushy-mushy-mushy love you!
5/8/2007 1:50 PM

I am only now realizing one can't draw right onto acrylic felt with a pencil (as this is only way I've ever embroidered on wool felt). Thanks for sharing!
5/8/2007 2:26 PM

Billy Blogger said ...
Great post. I had wondered how you created those felt labels without them becoming ruffled!
5/8/2007 4:15 PM

Angelina said ...
I love it when you take the mystery out of cool projects so that they seem more approachable. I love your hand embroidered tags.
5/8/2007 5:38 PM

LeeAnn said ...
Stabilizer is becoming a better friend to me. I have been using in more projects and I only just scratched the surface of its versitility. This was a great post!
5/8/2007 5:49 PM

Sonya said ...
Where there is a will there is a way - love that crafting ingenuity. I wondered how the labels looked so perfect.
5/8/2007 6:32 PM

Kate said ...
Great tutorial. Thanks!
5/8/2007 7:24 PM

dawna said ...
sweet! thank you so much for sharing your technique... i have been quietly admiring your hand-stitched labels and wondering how in the world i could do something similar for my own works.. i am excited to try this on my latest project... thanks again!
5/8/2007 10:54 PM

Elizabeth said ...
AHA!!!! The GREAT MYSTERY is solved! I kinda thought it was freehand but then I find myself staring at the label in my bag and wondering how the labels can all be so consistently lovely in all your bags if that was the case.
5/9/2007 2:30 AM

pamela said ...
great post! thx for sharing!
5/9/2007 9:13 AM

dottycookie said ...
I love this idea - your labels are so individual and I've been wondering how you stitched them so accurately - my embroidered names are never so pretty!
5/9/2007 3:11 PM

Christine said ...
Oh thank you! Last time I embroidered on felt I had to do it freehand as I couldn't figure out how to transfer the text on to it. Now I have a solution :)
5/9/2007 3:40 PM

flibberdy jibbets! What a great idea.. waht about taking it a step further and using water soluble stuff? The kind that people do 3d embroidery on.. I just did a quick search and found this:

http://www.janome.com/product_show.php?id=617

BTW, thankyou so much for your postcard!! What a lovely surprise that was.. apologies for the tardy thankyou :)

Jules x
5/9/2007 6:48 PM

le voila said ...
lovely tutorial Thanks :D
5/10/2007 4:05 PM

emily said ...
These are incredible!!!

They are really the sweetest labels I've ever seen :)
5/11/2007 9:38 AM

Anonymous said ...
thanks, i was just trying to figure out how to make my own labels.perfect timing.
5/11/2007 10:45 AM

Rachelle said ...
Oh WOW. Your attention to detail blows my mind!
5/11/2007 1:01 PM

JoePampano said ...
Wow Futuregirl! I really love your stuff :)

JoePampano
5/11/2007 6:21 PM

One Crabapple said ...
o my gosh ! this is SO KOOL

Thank You !!

What a great tutorial. You did such a good job !

It's written well
it looks even BETTER

This is really really GOOD !

Thank you so much for this information
Love, S
5/12/2007 12:31 AM

Jen said ...
Wow, what a GREAT idea! Tissue paper might work well, too, since it's so light...expensive, though, but as small as your little patches are, it might not be too horrible.

Fab idea, thanks so much!
5/16/2007 6:44 PM

iki said ...
I could never do something like this! I don't have it in me. And I love the effect!
5/17/2007 6:49 PM

Rebecca said ...
THANK YOU!!!! I have been trying to find an affordable alternative to custom labels, now I know what to do!
5/29/2007 11:32 AM

MsFortuknit said ...
ahhhhh! Thanks for that tip!
6/26/2007 10:25 PM

JC said ...
My friend Shay Toner came up with the idea to use Glad Press'n Seal to transfer designs. It stays stuck while you need it to, then peels off when you're done. I think she uses a Sharpie to ink the pattern onto the Press'n Seal. I haven't tried it, but it works great for her!
6/30/2007 2:26 AM

Anonymous said ...
Someone in the comments mentioned cross stitching waste fabric. It wouldn't really work for this purpose, though. Waste fabric is essentially only the grid which you put on top of t-shirts, bags, whatever, in order to give yourself even squares for your crosses.

It does not come away all that easily, either. It needs to be soaked down, then each thread (and there are two per direction, per stitch) needs to be pulled out with tweezers. It is messy and takes for ever and ever.

It is excellent for cross stitching where the width of each stitch needs to be the same, but for more freehand work, even plain paper would be more helpful.

:)

Kim D
ladygekko@gmail.com
7/5/2007 8:17 AM

Craftybernie said ...
It's a very effective and cute way of making lables/tags for your makes. Thanks for sharing.

It's probably something you've tried before but have you considered the water soluble papers that are available - there's one in particular which you can sew over and it simply melts away when wet.

I've used waste canvas to embellish designs onto my daughter's bedroom cushions and haven't found it difficult to remove. Although I imagine on felt it could be tricky.

Thanks again futuregirl!!!
7/6/2007 2:52 PM

Judi said ...
I love that idea! Great job and nice tutorial too.
7/29/2007 6:50 AM

Anna-Maija said ...
Hi - just a thought:

Why not trace the text as a mirror image on the stabilizer (or some other material) and sow it on from the backside? This way you won't have to remove the stabilizer.

Your stuffed animals are supercute! :)
7/29/2007 3:46 PM

Jill Smith said ...
I have used a photo print on felt, just did the freezer paper method and used light colours of felt. Am doing a contempotay wall hanging and background is 6 colours of different sheets of felt, just though l don't use kummin felt , l use the old fashioned felt but l do love your labels and am thinking they would be nice on the back of my wall hangings,
Jill
www.jillsmithart.com
9/27/2007 4:38 PM

Anonymous said ...
I do know they make stabilizer that dissolves in water, which eliminates the cutting part of the process.
10/8/2007 6:13 PM

mooseandbear said ...
how did the wax paper test go? I'm going to try that next I think - I've had a hard time trying to use a transfer pencil with felt and it just being, well, rubbish!
12/30/2007 6:18 PM

Jessica said ...
That's great I've been wanting to make my own labels for my stuff and now I can without a HUGE cost!
1/23/2008 9:25 PM

suzettaw@comcast.net said ...
What about Sulky Solvy? I have never used it but have heard it is great stuff.
1/29/2008 12:50 PM

Apex said ...
Great post. Thank you
2/26/2008 10:49 PM

Sonja said ...
I've been making labels for years. It's a necessary evil after your infant comes home wearing someone else's trousers, but mine never come out as nice as yours.

Anyway, I use water soluble solvy with permanent markers. When I'm done, just dip the ribbon in water and voila! Now...if only I could get the superb results that you get LOL. You're so talented!
3/5/2008 4:21 PM

trillium said ...
Have you tried using a Faber-Castell Pitt Artist's Pen? It comes in fine, medium, or brush tips and is indelible. Black and some colors are available.
3/17/2008 9:00 PM

Stephanie said ...
I used your tutorial as a guide last night. I had to embroider some names on two plush toys I made. Your tutorial helped me so much. Thanks!!!
4/23/2008 9:04 AM

theabea said ...
I have never had a problem with using an iron on transfer on felt. I thought it would melt too but it dosn't unless you leave the iron on it for too long.
5/8/2008 3:18 AM

Vivian said ...
Gosh you rock. I wrote about your labels since I had a major idea explosion when I read this post.I am working on it this weekend! You are a life saver! Love your blog!
5/18/2008 12:28 PM

Jackie said ...
I'm going to try this tonight. Thanks for the tutorial.
6/13/2008 5:38 PM

Sonja said ...
I don't know if anyone else recommended this, but I think that I finally found something that is fool-proof for this type of embroidery.

Sulky now offers Ultra Solvy, which is water soluble, as well as the solvy I have always used, but it's a lot heavier. I also discovered (reading is fundamental...hehe) that rather than tossing my scraps of solvy, I can use them to make liquid stabilizer.

Ultra solvy is about the weight of light, clear, vinyl. I've tried it once and will never use anything else for my hand embroidery projects!


8/2/2008 7:09 AM

Ann said ...
I love this tutorial. I wasn't sure how to remove the stabilizer.

THANKS
8/4/2008 4:05 PM

This is such a cool blog and the idea with making felt labels with embroidery is great!
8/12/2008 4:25 AM

Jen said ...
I've had excellent luck with transfer patterns on felt. The trick is to use a low heat, slightly over the synthetic mark, and lots of time and pressure. If it takes 5 seconds on cotton heat, give it 30 before you check the transfer. Also, a good transfer paper works miracles. I always have problems getting the little peices of stabilizer out of my embroidery without distorting the stitches. :(
8/30/2008 12:17 PM

Apex Designs said ...
Good idea i will try this. wonder if a no show stabilizer is to light.
9/5/2008 7:39 PM

Hi!! I did that but with crepe paper and it's easier to remove, thanks for sharng ideas!!

Grettings from El Salvador!
9/16/2008 2:07 PM

ZBagz said ...
I also make my own labels for my bags. I found fabric pens on 100% cotton works really well and ...fun!
9/23/2008 11:56 AM

Joey van Oort said ...
I didn't have a chance to read all of the comments so maybe someone has made this suggestion, but I would be tempted to have a rubber stamp made so that you can stamp it on the felt and then embroider over it.
10/6/2008 11:03 PM

Aimee said ...
Alice, I love love love this tutorial, as I was just trying to figure out how to transfer my kids' designs to felt for this project (http://poutonawhim.blogspot.com/2007/11/eyeglasses-case.html). I wonder...since I'm on a buying hiatus (trying to only use things I already own), do you think this would work using tracing paper as a tear-away? I guess all I can do is try, eh?
11/9/2008 1:49 PM

urbanoceanix said ...
I use tissue paper - it tears away easily once I'm finished, but does have a tendancy to tear as I'm stitching. I just have to be careful.
12/14/2008 6:32 AM

Hai Alice, your works so awesome, i've read it over and over, you're inspiring me to do lot of crafts. I try to make my label as yours but it doesnt work properly, its because i didnt used stabilizer as yours, and i dont have idea how to get it here, is it okay if i use a paper?thanks for inspiring me alot.
1/29/2009 12:12 AM

I do lots of embroidery on felt. Sometimes free hand, but usually I draw a design onto tissue paper, pin or baste onto felt, and stitch right through. Tears away easily when I'm done. Also, you can purchase a roll of thicker pale gold tissue paper on embroidery sites. It works well too.
5/13/2009 11:14 AM

Zephyris said ...
I am totally addicted to these labels! Thank so much for the detailed instructions. I have tried the tear away and the wax paper and I prefer the wax paper. It comes away much more cleanly and doesn’t require as much picking at. In any case, I would have never known how to make my own labels without you! Thanks!
6/10/2009 2:42 PM

futuregirl said ...
Well, I have a sh*tload of the tear away stabilizer, so I'll have to wait to try out the wax paper trick. I bet I'd like it better, too, because the fiddly picking is *so* time consuming. :)
6/12/2009 10:42 PM

Patty said ...
I must say that I absolutley love your labels. Now, I can mark my territory and keep my MIL from saying she made something that I did (long story. And I can put labels on my stuff that I make for other people. Thank you very much for this!
7/17/2009 12:37 PM

margaret rocha said ...
Adorei essa idéia.
10/7/2009 2:37 PM

qltrgrl said ...
What a wonderful idea! I have a couple of suggstions. They do make a couple of tear away stabilizers for machine embroidery. They may seem more opaque, but if you hold this up to a window or use a light box you'll be all set.

If you are tracing something that you cannot easily mirror image, my next suggestion will be especially helpful...once you have traced your design onto the stabilizer, flip it over (place right side of stabilizer to wrong size of label) and place it on the back of the label. Now stitch from the back, following your design making it look pretty on the 'front' and you do not have to remove the stabilizer! Hope this is helpful!
10/7/2009 7:36 PM

qltrgrl said ...
PS...for the leave the stabiizer behind the label version, use a stabilizer you can leave in (a sew-in type) and not a cut away which may 'lump' up in washing.
10/7/2009 7:39 PM

futuregirl said ...
qltgrl ... Great suggestions! Personally, stitching with the pattern on the back would be pretty hard for me. It might not be so critical for a design, but for words, I need the stitching lines to be on the top. Thanks for the ideas!
11/28/2009 1:21 AM

Becca-Lou said ...
Thanks for this. So simple but really effective and useful. Your labels always look so fantastic I'm so pleased you wrote, and I found this tutorial.
12/11/2009 9:04 AM

Kara said ...
Hey Futuregirl, I just saw on Feeling Stitchy the use of water-soluble stabilising material that washes off with water once you have transferred your design (if you can wet the felt, this might be an easier option). :)
5/20/2010 7:40 AM

Busy Bee said ...
Oooo thank you so much for this tutorial, its very good. I followed a link from another blog praising it, and glad I did. Always pays to have a look at friends recommendations. X X :o)
7/29/2010 3:17 AM

futuregirl replied ...
Busy Bee ... So true! Thanks for stopping by and leaving a comment. :)
8/11/2010 12:04 AM

Ely Faggi said ...
Thank you so much futuregirl for this tutorial! It's soooooooo great!! I made some handbags myself and had no idea of how putting my logo on it! Thanx!!
9/3/2010 1:14 AM

futuregirl replied ...
Ely Faggi ... You are welcome! :)
9/13/2010 7:56 PM

Merry said ...
Okay, there are sooo many comments here that I don't think I could add anything more to them; except that I am very impressed at the patience you obviously exercise. Unfortunately 'Patience'is not a good friend of mine :)
10/6/2010 1:11 PM

futuregirl replied ...
Merry ... No matter how many comments I have, I appreciate you taking the time to let me know you like my tutorial! :) Thanks for stopping by today and leaving such sweet comments.
10/6/2010 9:36 PM

Kelly said ...
I wanted to send you another THANK YOU! I was wrapping Christmas gifts (all handmade) and realized I had absolutely no gift tags and had only bought gift bags and tissue paper. They all matched and I had no idea how to come up with a gift tag, when I remembered this tutorial. So I cut out squares of felt, hand embroidered each person's first initial, cut a slit in the upper corner and used cotton yarn to attach them to the bags! They were a huge hit and I never would have thought of it without your amazing tutorials, so THANK YOU!!! :)
12/25/2010 9:36 AM

futuregirl replied ...
Kelly ... What a great idea! I bet they looked awesome. Crafting saves the day!
12/29/2010 7:06 PM

Patti said ...
Thank you to whoever gave the suggestion to use wax paper and a Sharpie. It worked beautifully and I didn't have to buy any special supplies. THANK YOU. ~Patti
12/28/2010 9:23 AM

futuregirl replied ...
Patti ... Perfect! Thanks for leaving a comment. :)
12/29/2010 7:07 PM

Jennifer said ...
You are a genius. So far, I've took advice from this tutorial and the purse lining one. One stop question answer-er!
Thank you SO much!
1/7/2011 11:17 AM

futuregirl replied ...
Jennifer ... Gah! Thanks for the great comment!
1/20/2011 8:51 PM

robin grover said ...
They have lighter stabilizer at Joann's. I just finished a sewing class there.
1/25/2011 5:39 PM

futuregirl replied ...
robin grover ... Thanks for the tip!
1/27/2011 12:42 PM

Kitty said ...
Thanks for the great tutorial. I was working on a valentine project at my Mom's. She didn't have stabilizer or wax paper on hand (what kind of mom doesn't have wax paper). We used Cling Wrap by Glad instead. It stuck onto the felt like a dream - no need for pins! It didn't shift and didn't require a great deal of work to pull it off either. Pretty slick. Your tutorial and feedback from other commenters was super helpful. Thanks!
2/7/2011 4:12 PM

futuregirl replied ...
Kitty ... How industrious of you! Good to know cling wrap will work in a pinch. :)
2/7/2011 4:52 PM

Janda said ...
Hi futuregirl!

It's been a while since I have left a comment for you, but I HAD to tell you that I was working on a project the last 2 days and needed to embroider a pattern (outline of my favorite scissors) on a scissors case I was making. I remembered this post that you had written and just now looked for it. I had gone ahead and used tracing paper and pinned it to the sweater fabric I was using for the little pouch. It worked quite well, though it seemed tricky to remove the paper. After reading many of these comments, however, I think the tracing paper is a good option.

Thank you so much for all your wonderful posts and tutorials! Your attention to detail is magnificent, and your clear instructions are commendable!

I have a link to your blog on my blog, thesweaterproject.blogspot.com, so I can easily find you on a daily basis (as well as others that visit me). Refreshing therapy for a crazy world :-].

Best Always,
Janda
4/6/2011 12:07 PM

futuregirl replied ...
Janda ... Thank you so much for the sweet comment. You are too sweet! :)
4/14/2011 12:01 AM

Lavialle said ...
I didn't read all ofyour comments, but I wasn't sure if you knew about (or if anybody mentioned) Transfer-Eze. It's what I use and I couldn't do the embroidery that I do on felt without it.
4/15/2011 5:10 PM

futuregirl replied ...
Lavialle ... You're the first to mention it! Thanks for the tip. I'll have to look for some. :)
4/15/2011 7:39 PM

Kathie Robinson said ...
How about trying that stabilizer that disappears with an iron. I can't remember the name of it.
8/18/2011 9:22 PM

Laura M said ...
Another thank you! I'm working on a felt project and need to embrioder the text - but couldn't use my marking pens as the felt is too thick to see through on my light box. You saved me a frantic trip to the craft store!
11/5/2011 6:06 PM

tishushu said ...
awe to the SOME! So gonna do this this weekend!
2/14/2012 7:01 PM

????? ?????? said ...
thank you so much ;)
7/4/2012 9:31 AM

????? ?????? said ...
thank you so much :)
7/15/2012 3:03 PM

Toni said ...
Love your blog Futuregirl! Thanks for the great tutorial on making felt embroidered labels. I will begin mine as soon as I post this comment. My question is whether or not I can print on waxed paper...I'll try it and let you know...
7/19/2012 9:54 AM

Sewrosey said ...
What a great idea. I have been looking at putting labels on my projects and wanted to embroider mine. Hope you don't mind if I borrow your idea - it is wonderful
1/15/2013 11:49 PM

futuregirl replied ...
Sewrosey ... I don't mind at all! That's wht I made the tutorial. :)
1/26/2013 3:31 PM

Poonam said ...
Thanks for your tutorials and for sharing your work. You are awesome!
4/7/2013 12:53 AM

Salinah said ...
You are super talented! I need to make a pillow cover (with words) for my bestfriend's wedding and your tutorial is a savior! Thank you!
10/1/2013 11:49 PM

Mire said ...
Hi there, futuregirl! :)
I am reading your blog from Spain and I love it. I have been feeling craft lately so I have been browsing the web for ideas. Your labels are perfect for Christmas gift labels and I plan to make tons of them :)
Anyway, I am commenting here because i read you haven't found a pen that doesnt rub off... so I thought I might have an idea :) I would use one of those markers you use to write on CD's. I have a very fine tip one and I will try it. I need to find where can I find these stabilizers (I need to find the commercial brand for this stuff, it is not always the same as in the US).
Thank you so much for sharing your work and projects, I really appreciate it.
11/23/2013 3:07 AM
 
futuregirl replied ...
Mire ... Thanks for the pen idea! And the sweet comment. :)
11/30/2013 6:59 PM